

- name: Wizard Nebula (NGC 7380)
- location: Cepheus Constellation
- RA: 22hr 47' 21"; DEC: 58º 07' 54"
- distance from Earth: 7000 light-years
- magnitude: 7.2
- apparent size: 20'
About the Wizard Nebula (NGC 7380)
The Wizard Nebula (NGC 7380), discovered by Caroline Herschel in 1787, is located in the Cepheus constellation, at a distance of approximately 7,000 light-years from Earth, within our galaxy. What can be seen in images is an open star cluster surrounded by a nebula extending over a distance of about 110 light-years. The stars that make up the NGC 7380 cluster have formed within the last 5 million years, which, in astronomical terms, means this is a relatively young star cluster.
The Wizard Nebula is almost impossible to see with the naked eye. Only those in areas with extremely dark skies (Bortle <3) may have a chance to barely glimpse the silhouette of the Wizard, possibly with the help of Ha or OIII filters. For this reason, NGC 7380 is primarily an astrophotography target rather than a visual one.
Gallery – 4 images of the Wizard Nebula (NGC 7380)
This is the second time I have photographed this subject (on July 7 and 8, 2024, totaling 7 hours and 45 minutes).
Equipment: SW EQ6-R mount, ASI 533MC camera cooled to -5°C, Optolong L-eXtreme filter, Esprit 100ED telescope with field flattener, ASIAIR+.
Gallery – 4 images of the Wizard Nebula (NGC 7380)
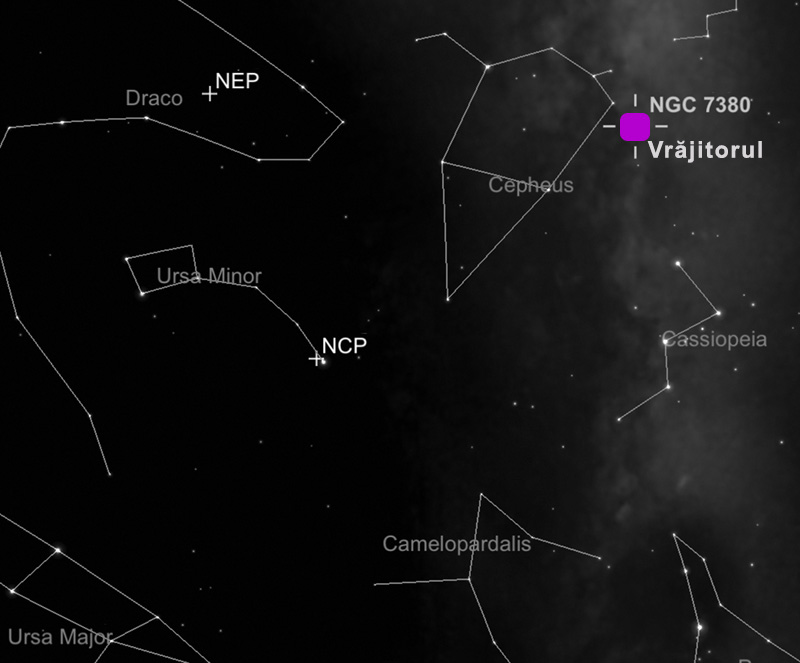
How to find the Wizard Nebula in the sky (Cepheus)
Since this is mainly an astrophotography target rather than a visual one, it is enough to know the approximate position of the nebula. When imaging, we either use a Go-To mount that points precisely to the target, or a simple star tracker, as I did, in which case we can rely on plate-solving algorithms that accurately determine the exact sky position the telescope/lens is pointing at.
If we use a star tracker, once we know the coordinates our lens is pointing to and the coordinates of our target, we can gradually approach it through fine successive adjustments, modifying the position on the right ascension (RA) axis and then on declination (DEC). I use ASIAIR+, which can easily identify the coordinates of the image center through plate-solving.
If we identify the Cepheus constellation in the northern sky (which is relatively easy) and divide it into a triangle above a rectangle of stars, we can use the “bottom side” of that rectangle (the side farther from Polaris) as a reference.
In terms of sky landmarks, the Wizard Nebula is located near the star Delta Cephei, on the “bottom side” of that rectangle, toward the Cassiopeia and Lacerta side, as shown in the image below.
Useful tips for photographing the Wizard Nebula (NGC 7380)
I photographed the nebula on August 16, 2022, from a rural area (Bortle 4), on a warm summer night with temperatures above 20°C. For this reason, I cooled the camera only to -5°C.
Since Cepheus is a circumpolar constellation, there is no strictly optimal season for imaging this nebula. As a general recommendation, summer and autumn are good periods. It is important to avoid times when the nebula is very low on the horizon during imaging, to prevent obstruction by trees, buildings, etc.
A narrowband filter is necessary if using a color camera (as I did), or alternatively one can use a mono camera with Ha, OIII, and SII filters (this being the optimal approach).
It can also be attempted with a modified DSLR together with a nebula filter (for example: Optolong L-eXtreme, L-Ultimate, L-Enhance, Antlia ALP-T 2" Dualband 5nm, or an IDAS nebula filter). I’m not sure how it would look with a standard DSLR/Mirrorless, but a filter from the list above would certainly be required.
For acceptable results, a total integration time of at least 2–3 hours is needed.
Equipment used:
- Mount (star tracker): iOptron SkyGuider Pro with iPolar (polar alignment using a laptop)
- Camera: ZWO ASI 533 MC-PRO, gain 101, -5°C
- Lens: Sigma 150-600 f/5.6-6.3 Contemporary at 600mm and f/6.3
- Dual narrowband filter: Optolong L-eXtreme 1.5"
- ASIAIR+
- Guide camera: ASI 120 MM
- Tripod: Manfrotto CX PRO3
- 2 dedicated batteries: Omegon Pro Powerbank 96k LiFePO4 307Wh 12V + Celestron Powertank Lithium Pro LiFePO4 159Wh
Software used:
- PixInsight – those familiar with it can process the images entirely without the need for other software
- Photoshop – since I am not yet fully comfortable with PixInsight (especially for Levels, Topaz Denoise, and Adobe Camera Raw)
Tips for processing images of the Wizard Nebula (NGC 7380) in Cepheus


Single 120 sec frame (.fit debayered, BN) vs. final processed image
The good news is that the Wizard Nebula is not difficult to process. The difficulty level is moderate.
The first step is loading the frames (Light, Flat, Bias, etc.) into PixInsight using Script >> Batch Processing >> WeightedBatchPreprocessing to stack the frames, after which the software exports a single final image that we will work on. I prefer this simpler method, with fewer settings, although there are many more advanced stacking options (including in PixInsight). There are also several other software tools: DeepSkyStacker (most commonly used on Windows), SIRIL (Windows, Linux, and Mac), or Starry Sky Stacker (Mac).
Below you can see the following frames:
- a single frame (.fit format) with no processing applied (not even debayering)
- the master frame resulting from stacking all images, processed with: BackgroundNeutralization, ColorCalibration, SCNR
- the frame with stars removed using STARNET2 in PixInsight
- the processed starless frame
- the stars-only frame, which can be further processed for star reduction if needed
Then, using PIXELMATH, the two images are combined: the starless image + the stars-only image
For noise reduction, you can use NoiseXTerminator or EZ Denoise (in PixInsight) or Topaz DeNoise (in Photoshop)
You can also try processing in the HOO color palette: extract the color channels from the starless image, resulting in three images: R, G, B. Delete the B channel. Generate a new B channel by combining the R and G channels. Then create a new image from these three channels. An example can be seen in the gallery (image #4). A useful tutorial can be found here.