
- name: Andromeda Galaxy (M31, NGC 224)
- location: Andromeda constellation
- RA: 00hr 42' 44"; DEC: 41º 16' 08"
- distance from Earth: 2.6 million light-years
- magnitude: 3.4
- apparent size: 3.2º x 1º
About the Andromeda Galaxy (M31)
Andromeda is the closest major galaxy to the Milky Way, located about 2.6 million light-years away. Its name comes from the constellation it belongs to and originates from Greek mythology, where Andromeda was the wife of Perseus.
The gravitational attraction between our galaxy and Andromeda will eventually cause them to merge in about 4.5 billion years, forming a new galaxy. Until then, it remains one of the brightest objects in the Messier catalog (M31) and a spectacular target for both beginner and advanced astrophotographers. For me, Andromeda marked the beginning of my astrophotography journey in July 2022, when I first photographed it with a simple DSLR on a tripod. It was my first deep-sky object... so I have a special connection with it.
Due to its large apparent size (3.2º x 1º), it can be photographed using short focal lengths (100–400mm), with both camera lenses and small telescopes. Zoom lenses such as Canon/Nikon/Sigma 70–200, 70–300, Canon 100–400, Tamron/Sigma 150–600, or prime lenses like the Samyang 135mm can all be successfully used.
In theory, the Andromeda Galaxy is visible to the naked eye from very dark locations with minimal light pollution. Although I know where to look for it, I have not yet seen it directly—only photographed it. Most likely, I haven’t had the chance to observe it under Bortle 3 skies or darker.

Image gallery - Andromeda Galaxy
My first attempt at photographing a galaxy, and my first astrophotography attempt:
I first photographed the Andromeda Galaxy in July 2020, without a star-tracker, directly from a tripod using a Canon 7D DSLR (unmodified) and a Canon EF 85mm f/1.2L lens at f/1.2. I captured 31 exposures at ISO 1600, each 5 seconds long, then stacked them using Starry Sky Stacker on Mac. This resulted in a total integration time of 155 seconds (about 2.5 minutes).
Although the final image was very poor, for me it was a revelation: I couldn’t believe that a galaxy could be photographed with such simple equipment. Until then, I thought such images were only possible from professional observatories. Luckily, I discovered tutorials by Peter Zelinka, who clearly explained how to photograph galaxies and nebulae using a star-tracker, a DSLR, and camera lenses.
That’s how my journey into astrophotography began... I had previously taken Milky Way photos from mountain areas, and I had always been fascinated by night photography. However, I had never attempted deep-sky object (DSO) imaging before.
One of the biggest challenges was learning the night sky—identifying celestial reference points (bright stars in constellations) to locate my targets. I remember that in the beginning it sometimes took over an hour just to find the object. Once, I even gave up after more than 1.5 hours of trying to locate Andromeda using my Canon 7D and Sigma 150–600 lens at 150mm...
After purchasing a star-tracker (SkyGuider Pro with iPolar), I re-imaged Andromeda. This time I captured 36 frames of 1 minute and 20 seconds each, stacked together along with 3 dark frames. I used ISO 1600, Sigma 150–600 Contemporary lens at 400mm, f/6.3. Total integration time: 48 minutes.
I already noticed some improvements: first, there were no obvious star trails (elongated stars). Then, the resolution and detail were much better thanks to the longer focal length. However, processing was still very rudimentary.
This attempt was my most successful one in 2021. It was the first time I saw some (minor) progress.
I used the same SkyGuider Pro star-tracker with the Canon 7D and captured 38 frames at ISO 3200, each 2 minutes long, plus 3 dark frames. Sigma 150–600 lens at 400mm, f/6.3. At that time I was not guiding. Total integration time: 1 hour and 16 minutes. Back then, it felt like a very long session... in reality, the integration time was quite short and at least 2–3 more hours would have been needed.
For a long time, these were my best images of Andromeda. I also started experimenting with PixInsight, a powerful but quite challenging software, especially for beginners, due to its very different interface compared to Photoshop.
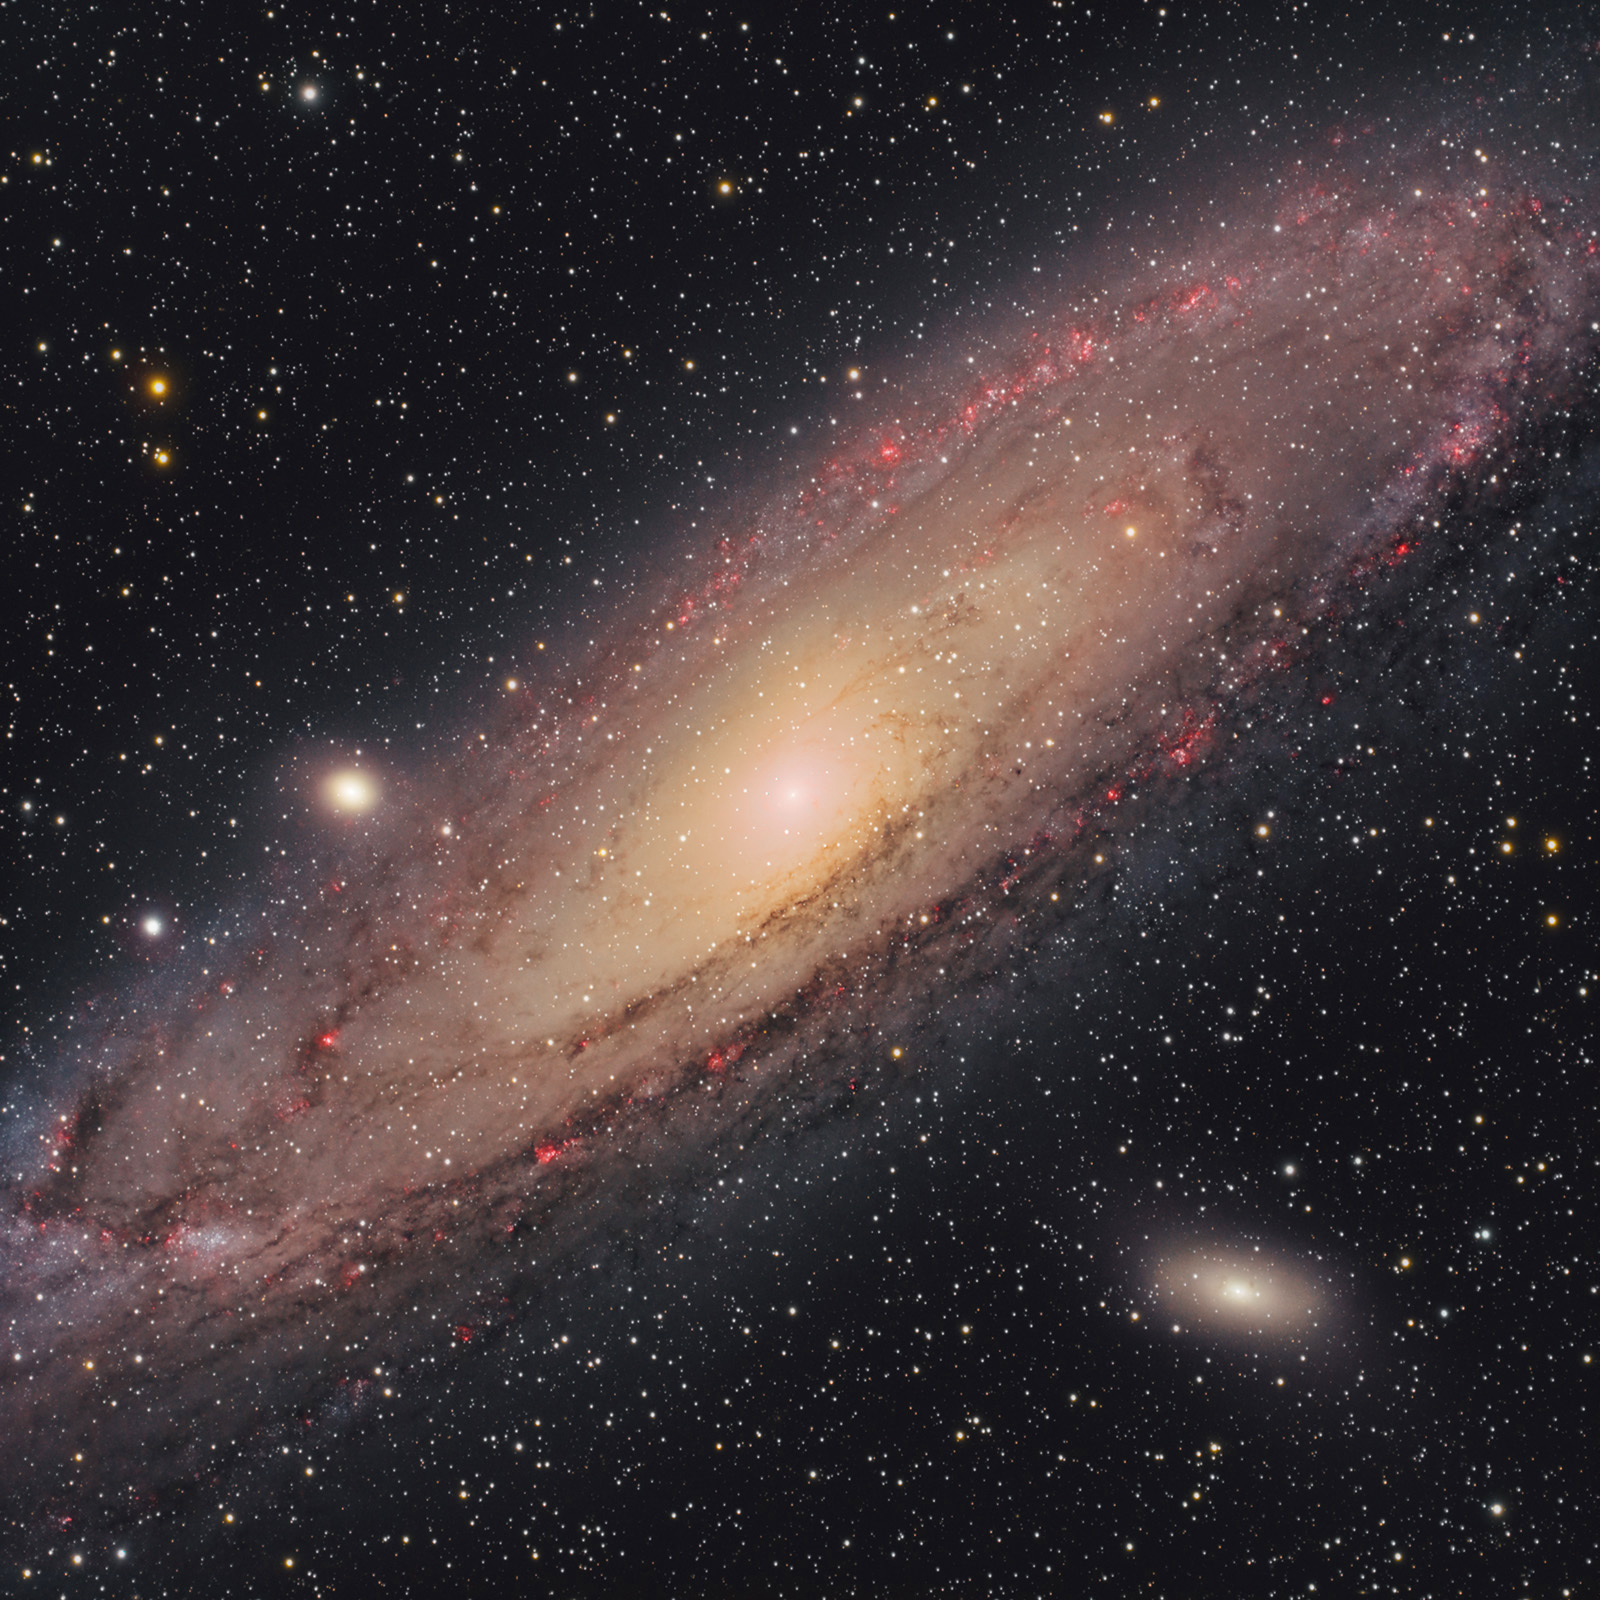
Several things had improved by then: I could locate targets much more easily using plate-solving algorithms provided by ASIAIR+, I improved the declination axis of the star-tracker allowing more precise adjustments, and I achieved much better balance on both RA and DEC (sometimes the balancing process alone takes over 30 minutes; I realized that without proper balance, the entire night can be wasted). Also, with a better understanding of PixInsight, image processing improved significantly.
I used better equipment: ZWO ASI 533 MC-PRO color camera cooled to -10°C, the same SkyGuider Pro with iPolar, RA guiding, ASIAIR mini-computer, Sigma 150–600 lens @200mm, f/7.1, along with an Optolong L-Pro light pollution filter.
Total integration time: 6 hours and 27 minutes. I captured 129 frames of 3 minutes each, 20 flat frames, and 100 bias frames. The session started at 19:30 and ended around 02:30 in the morning.
Only now I can say I am satisfied with the result, although there is still room for improvement.
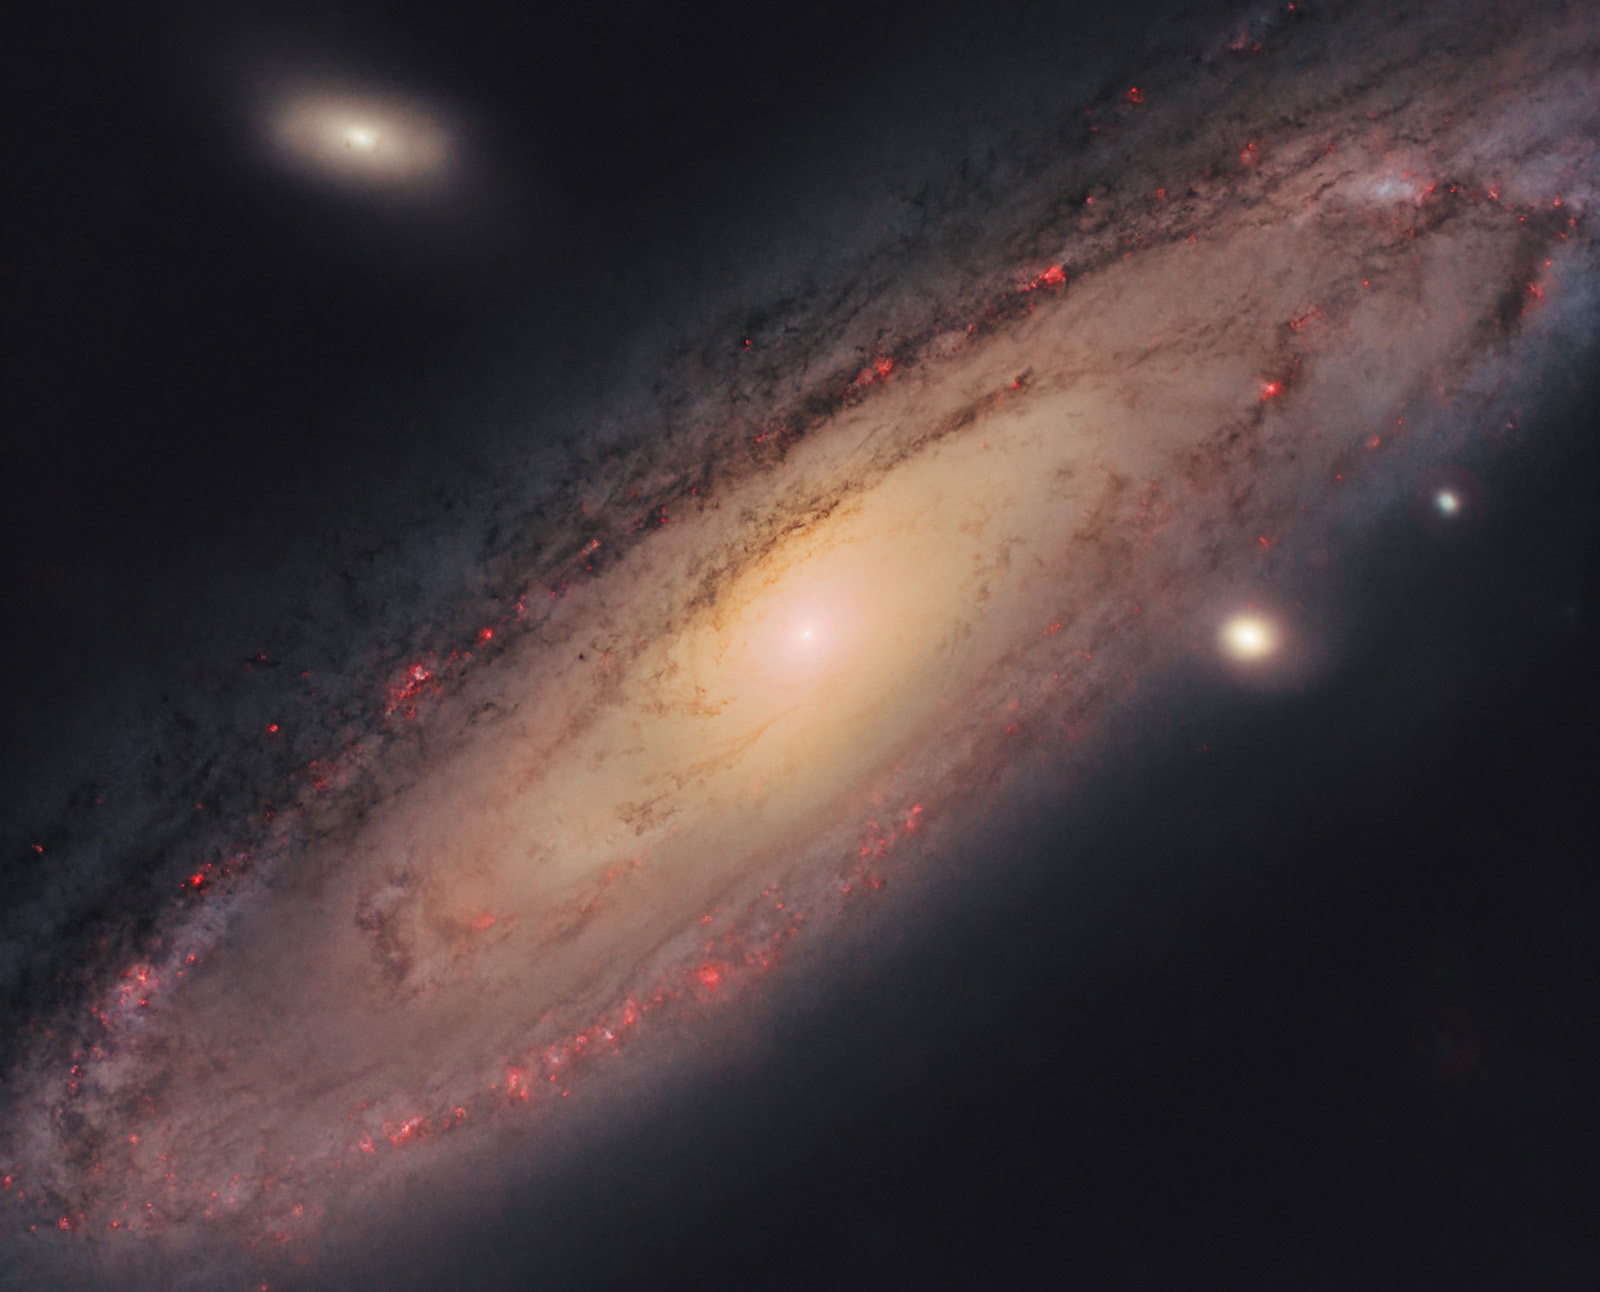
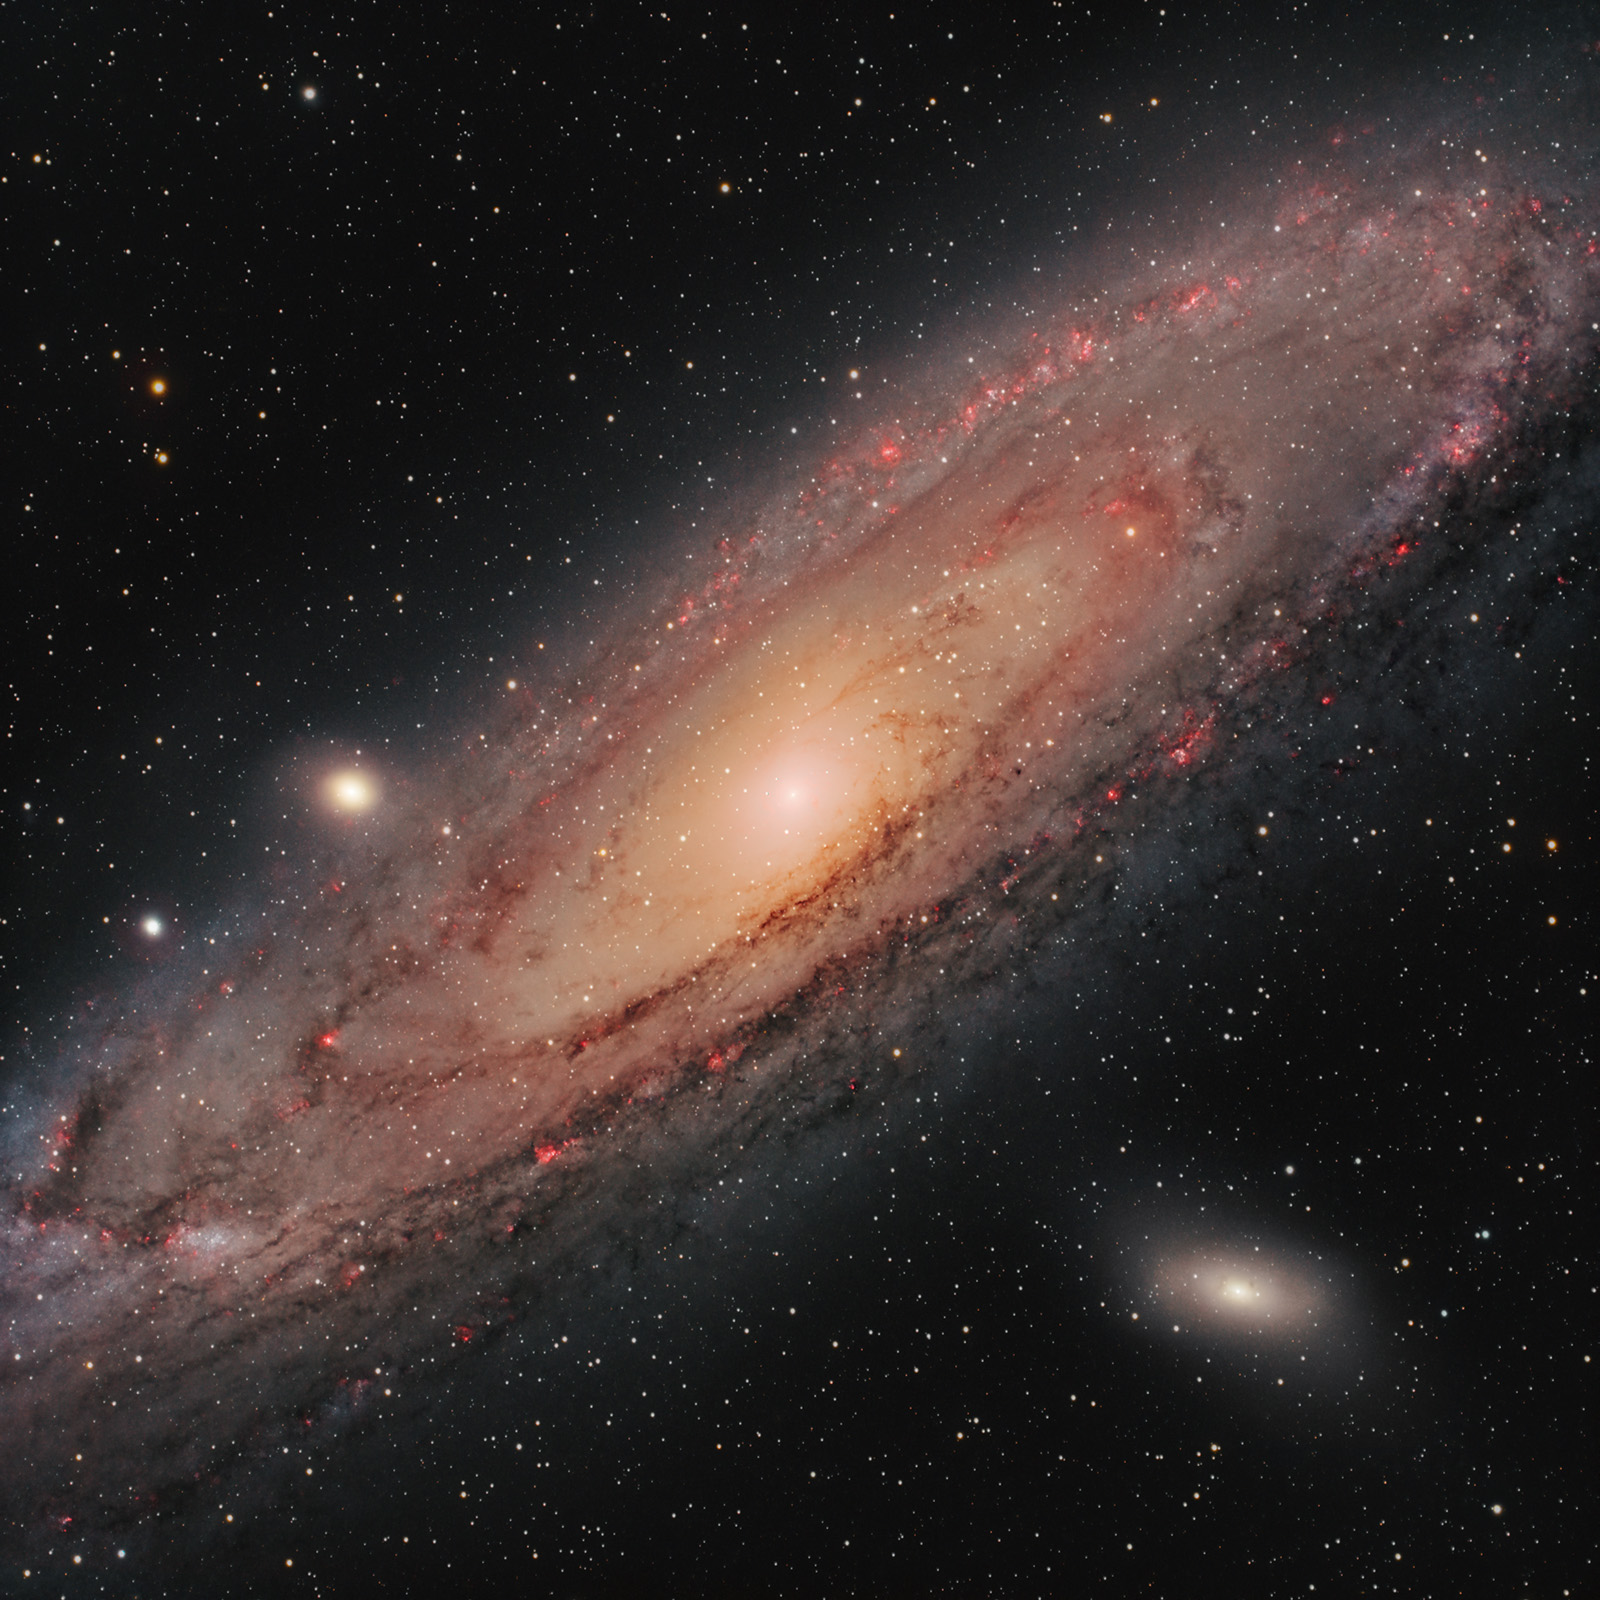
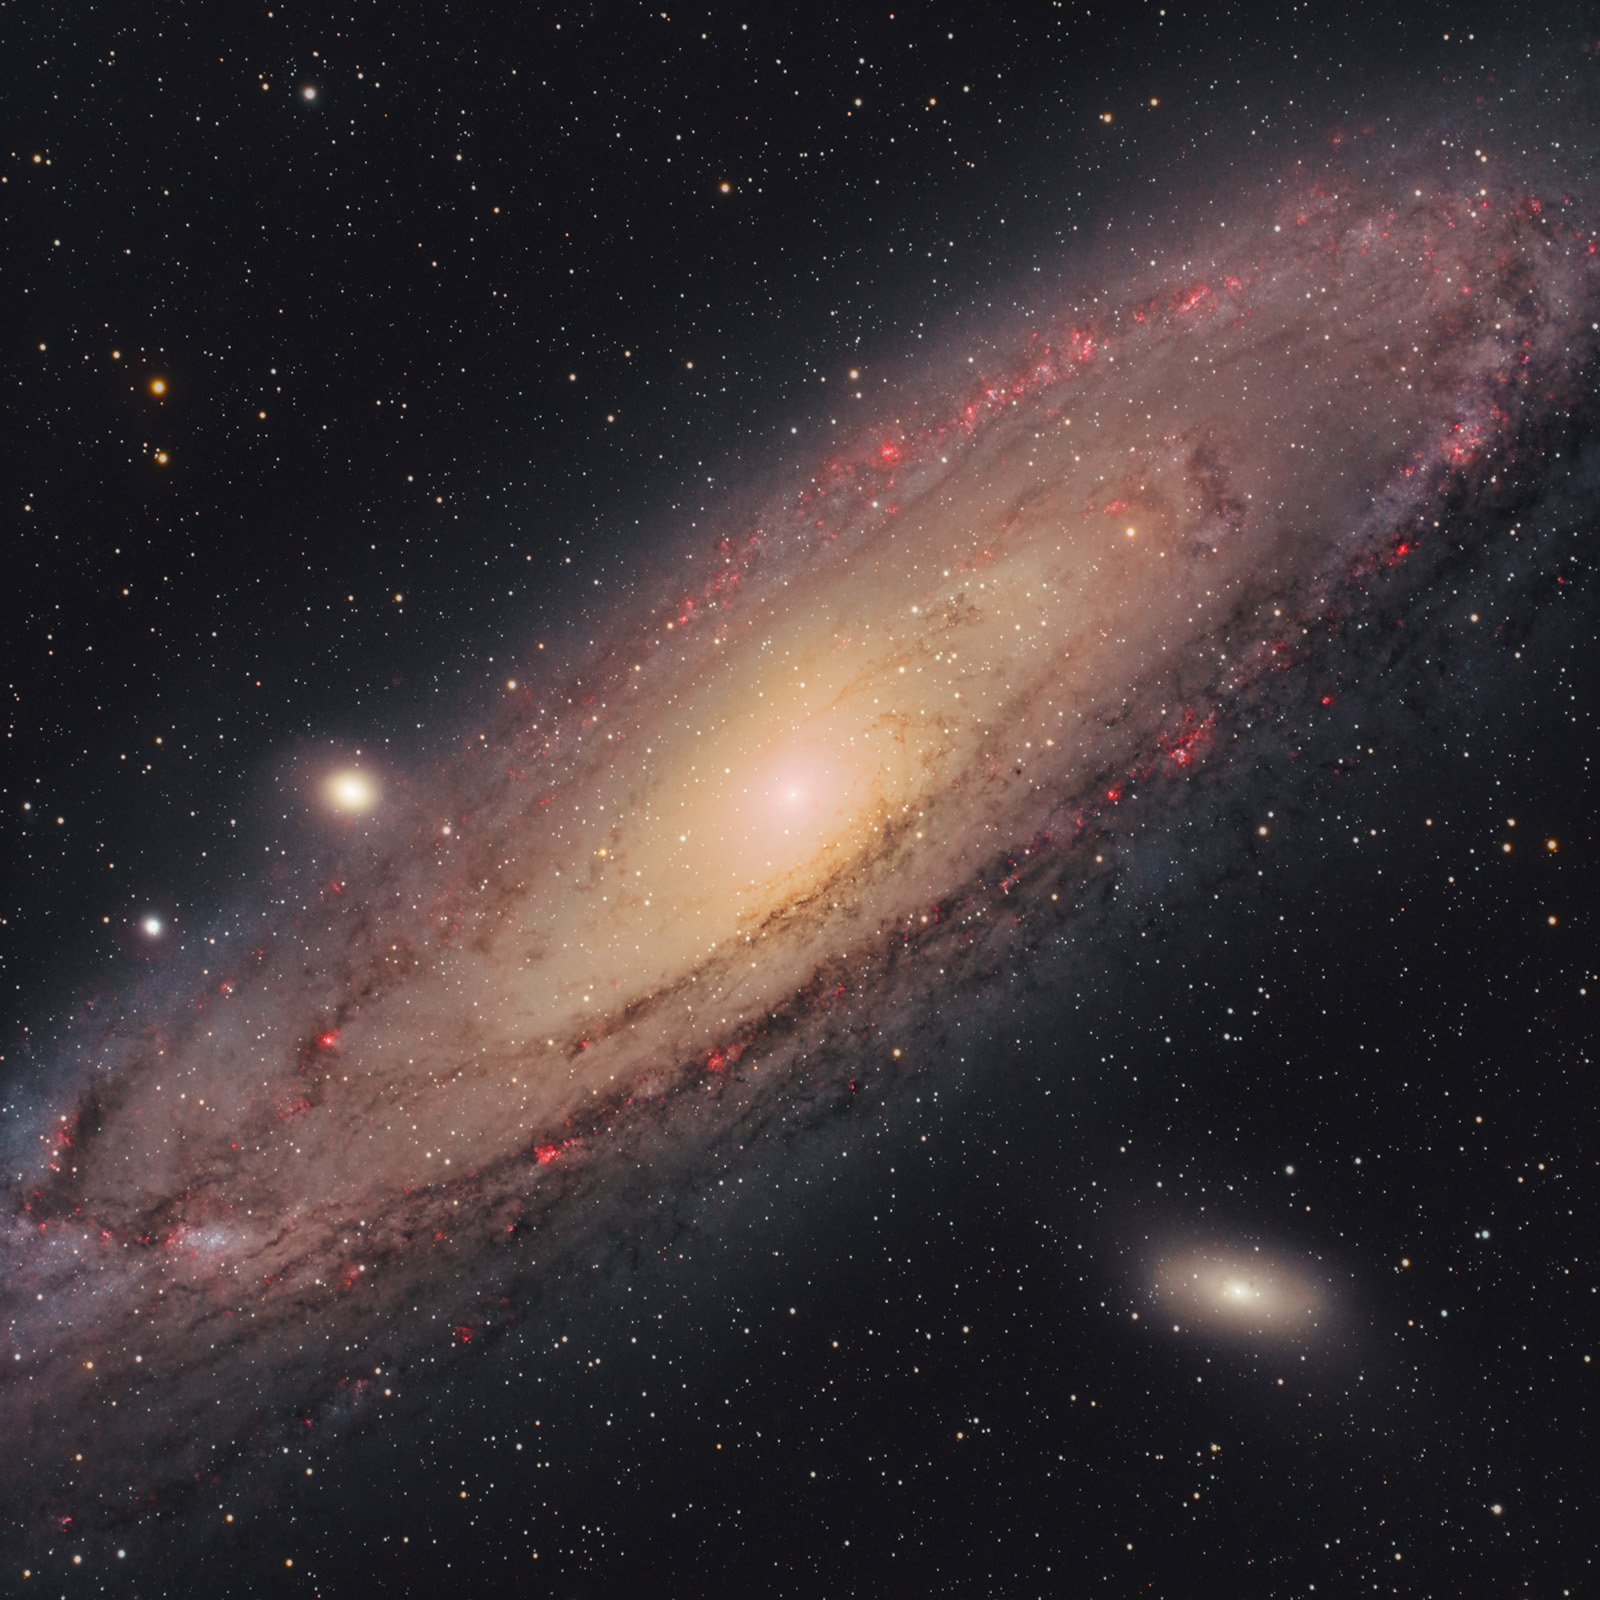
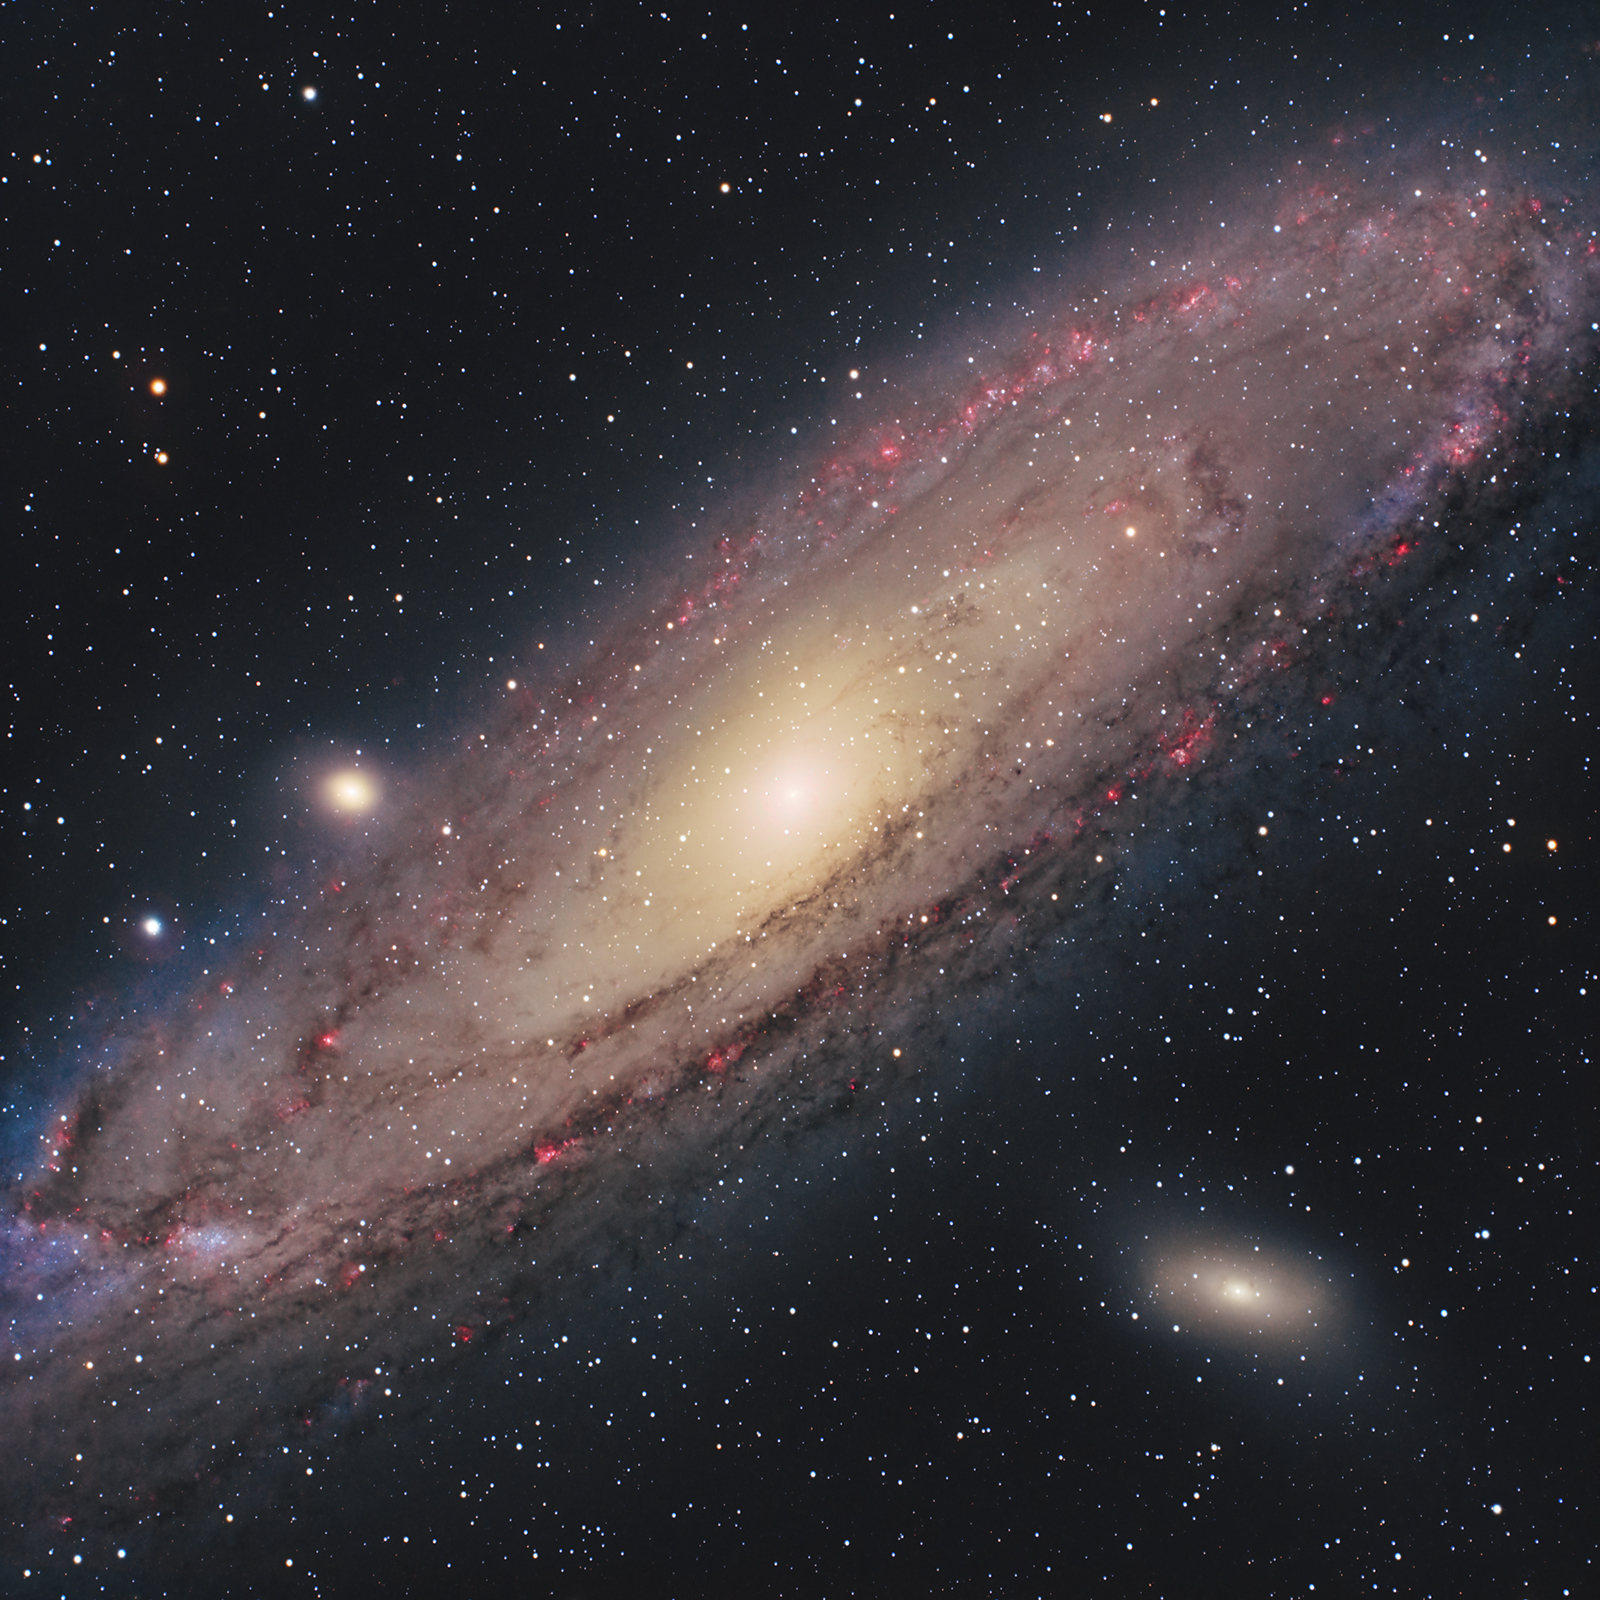
This time I used significantly improved equipment: the star-tracker was replaced with a GoTo mount (SW EQ6-R Pro), and the Sigma telephoto lens was replaced with the SW Esprit 100ED refractor with a TS-Optics field flattener, resulting in a focal length of 443 mm and f/4.3.
I used the same ZWO ASI 533 MC-PRO color camera, cooled to -5°C, along with the ASIAIR mini-computer, a Baader UV/IR filter, and an Optolong L-eXtreme filter to highlight the Hα-rich regions.
Integration time: 10 hours RGB + 5.5 hours for extracting the Hα signal.
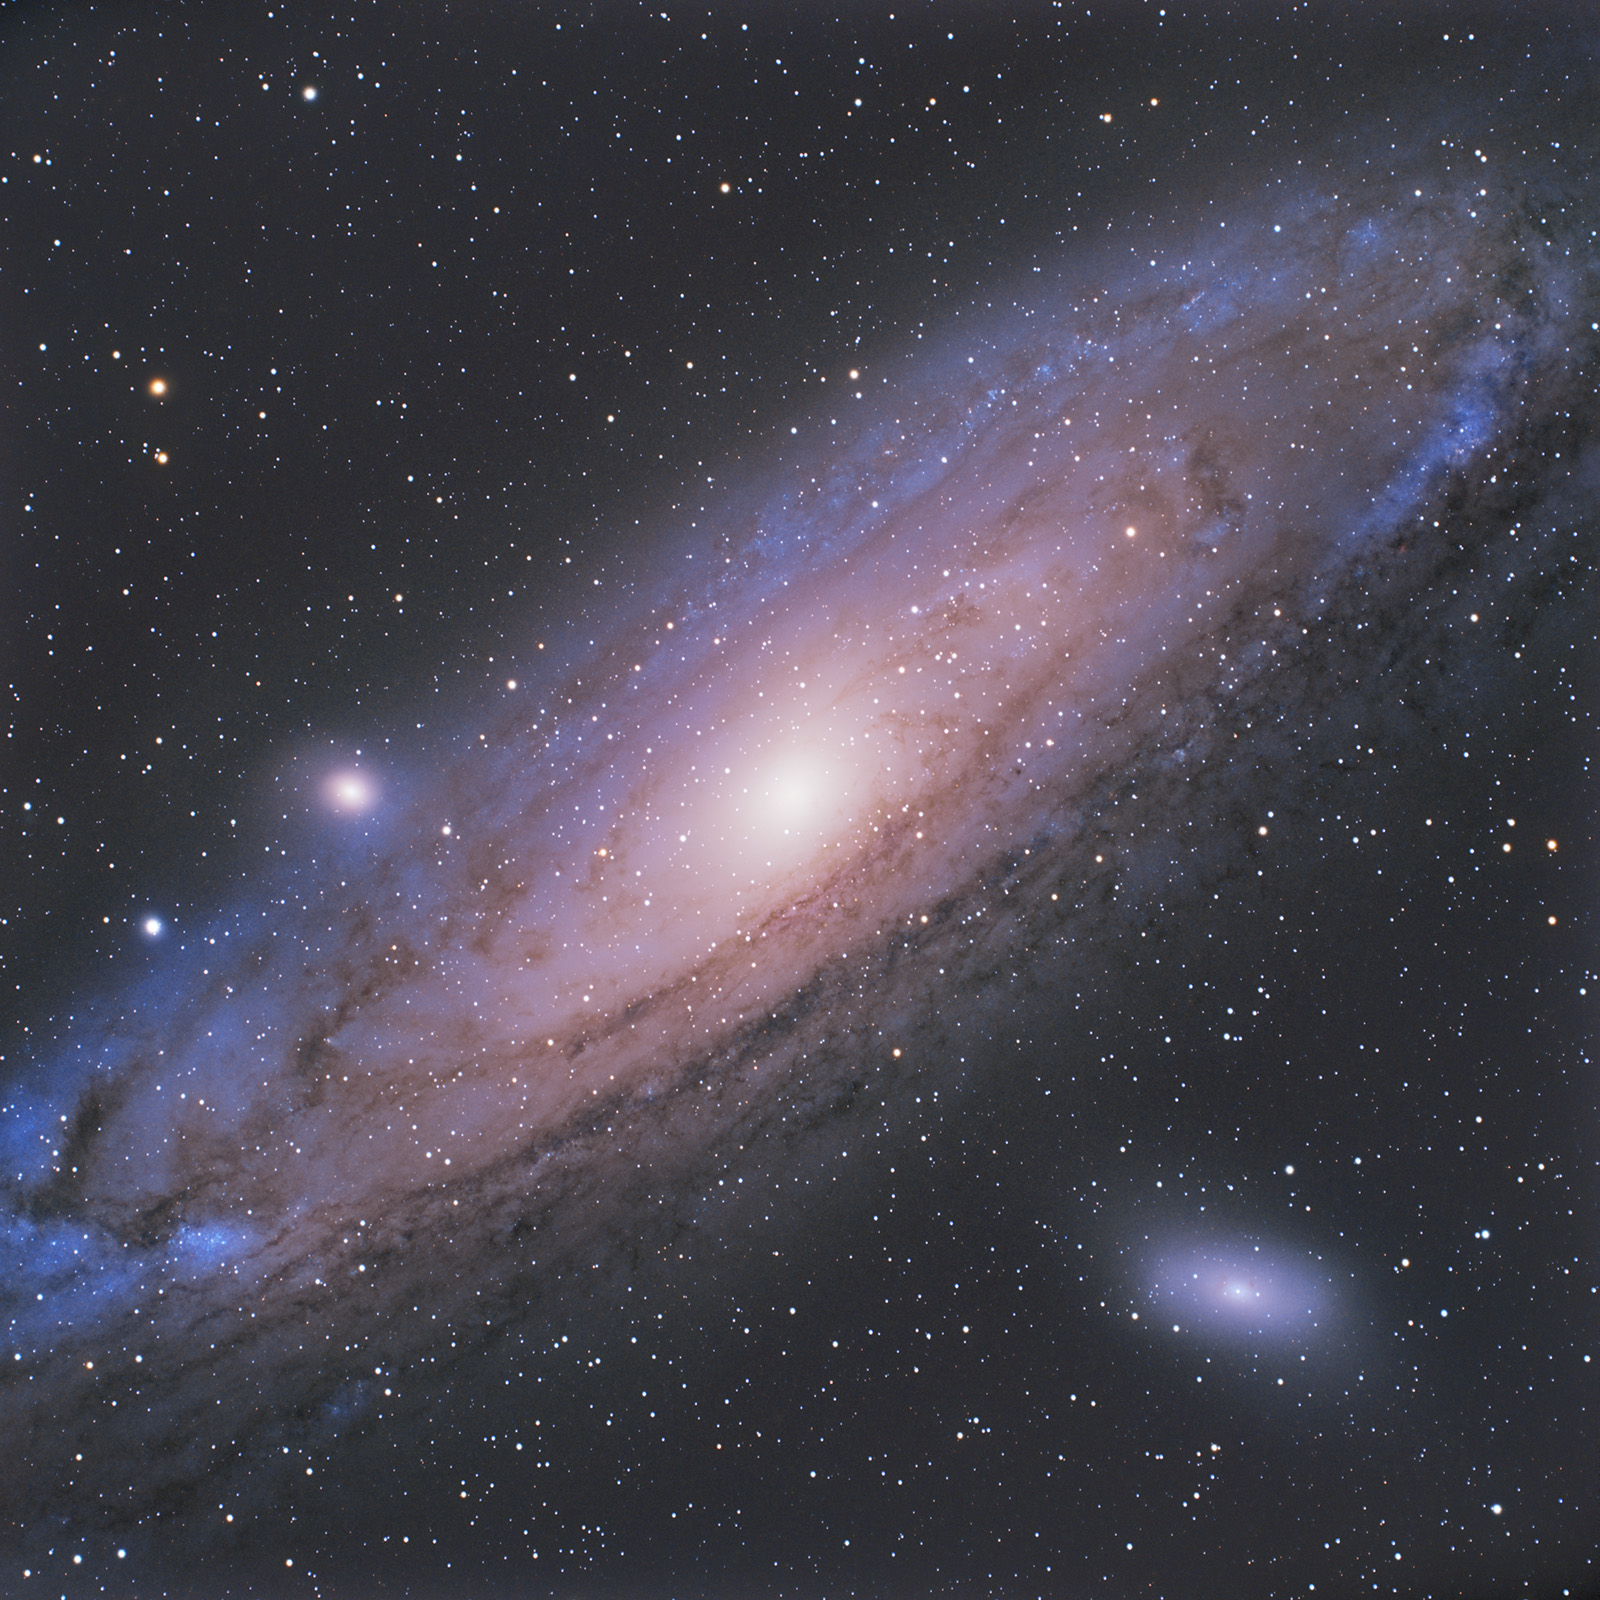
Initial processing in PixInsight produced visually pleasing images but with an excessive blue tint. I later reprocessed the data, achieving much more natural color balance.
How to find the Andromeda Galaxy (M31) in the sky
Visually, I use two celestial reference points: the Cassiopeia constellation and the Andromeda constellation.
Warning: do not confuse the Andromeda Galaxy - M31 (our subject) with the Andromeda constellation. The latter obviously covers a much larger area of the sky and is made up of many easily visible stars.
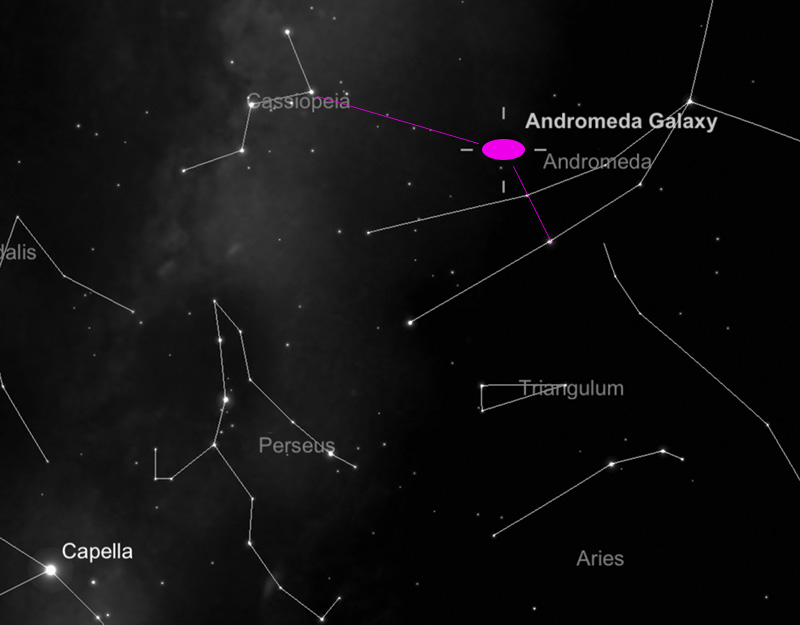
STEP 1) First, I identify the Cassiopeia constellation, which has the easily recognizable “W” (or inverted “M”) shape. By drawing an imaginary line roughly equal in length to Cassiopeia, in the direction indicated by the upper angle of the “W” (as shown in the adjacent image), we can approximately locate the position of the Andromeda Galaxy.
STEP 2) Once the general area is identified, we move to a more precise step. We identify the two central stars in the Andromeda constellation and draw an imaginary line between them, extending it by a distance equal to the separation between those two stars (see image).
- This allows us to determine the position of M31 with reasonable accuracy.
Those familiar with the night sky can skip the first step and identify M31 using only the two stars in the Andromeda constellation.
Step 1) is especially useful for beginners who may struggle to find Andromeda, but can easily recognize Cassiopeia.
Useful tips for photographing the Andromeda Galaxy
The best time to photograph Andromeda is from the second half of July through November. I have photographed it in July, August, and October. October feels ideal: temperatures are still comfortable and nights are long enough to start imaging early.
Andromeda is large (3.2º x 1º, allowing shorter focal lengths) and bright (magnitude 3.4, allowing shorter integration times). It is a target that can be photographed even with an unmodified DSLR. If you have a star-tracker (not necessarily a Go-To mount), a DSLR/Mirrorless camera, and at least 2–3 hours of integration in a Bortle < 6 sky, you can achieve a solid result. Processing is just as important as data acquisition.
A modified color camera (DSLR/Mirrorless) or a dedicated astronomy color camera is recommended. A mono camera can also be used, but for beginners it complicates the workflow (LRGB filters and multiple integrations).
If using an astronomy camera, typically a UV/IR filter is used under dark skies, or a light pollution filter if needed (for example Optolong L-Pro, as I used).
Exposure times do not need to be very long. Even 1-minute frames can work if you collect enough data. It is important to choose a proper ISO/Gain (ISO 400–3200 range is a good starting point) to preserve dynamic range and avoid overexposing the bright core. Calibration frames are essential: Flats, Darks, and Bias. For Flats, I use the ASIAIR tablet as a light panel (white screen placed over the lens). Flats remove vignetting and dust shadows.
Before starting the session, I checked humidity and dew forecast using the Clear Outside app. Since the risk was low, I avoided dew heaters to keep the setup lighter and reduce guiding errors. In mountain or hilly areas, dew formation is always a risk.
Advanced users can combine two imaging sessions: one RGB and one using an H-alpha filter. Overlaying the H-alpha signal onto the RGB image will reveal red emission regions, creating a more dramatic and detailed final image.
Processing images of the Andromeda Galaxy (M31)


Single 3-minute frame (.fit; Debayered, ColorCalibration, SCNR) vs. final processed frame
The first step is loading the frames (Light, Flat, Bias, etc.) into PixInsight using Script >> Batch Processing >> WeightedBatchPreprocessing in order to stack them. The software will then export a single master frame that we will process further. I prefer this simpler method, although more advanced stacking options exist (including within PixInsight). Other software options include DeepSkyStacker (Windows), SIRIL (Windows, Linux, Mac), and Starry Sky Stacker (Mac).
Some of the PixInsight processing steps applied to the final master-light frame:
- Screen Transfer Function (STF) ... to visualize the image
- Dynamic Crop
- Background Neutralization ... to remove the green tint
- Color Calibration, Spectrophotometric Color Correction
- SCNR
- Dynamic Background Extraction ... with manual point selection to remove light pollution gradients
- StarNet2 ... to generate two frames: starless and stars-only. From this point, processing is done on the starless image.
- Extract CIE L* component ... create and apply a luminance mask to process only the galaxy
- Curves Transformation ... to increase saturation and enhance colors
- Optional HDR Multiscale Transform ... to better expose the galaxy core
- Recombine the frames (starless + stars) using PixelMath
- Convert the image from linear to non-linear and export as TIFF
- Optional star reduction using Morphological Transformation or scripts by Bill (AnotherAstroChannel), explained in Lukomatiko’s video. Scripts can be downloaded here.
Below are several example frames:
- an unprocessed (.FIT) frame captured with ASI 533 MC-PRO (3 minutes)
- the master frame obtained after stacking all frames (unprocessed, gradient visible)
- the final processed starless frame
- the stars-only frame