

- name: The Elephant’s Trunk Nebula (IC 1396)
- location: Cepheus Constellation
- RA: 21hr 39' 06"; DEC: 57º 30' 00"
- distance from Earth: 2,400 light-years
- magnitude: 3.5
- apparent size: 1.5º
About the Elephant’s Trunk Nebula in the Cepheus Constellation
The Elephant’s Trunk Nebula is an emission nebula that is part of a much larger nebula known as IC 1396. What I actually photographed is the IC 1396 nebula, which contains, in the upper-right area (relative to my image), an elongated cosmic structure resembling a trunk.
In the future, I will probably revisit this target, focusing only on the "trunk" itself, using a focal length of 600 mm. For this image, in order to capture the entire IC 1396 nebula, I used a focal length of 250 mm.
The relatively large size of the IC 1396 nebula and the ease with which it can be identified in the sky make it an excellent target for beginner astrophotographers—provided they use dual-band filters (Ha + OIII) with a color camera, or Ha, OIII, and SII filters with a mono camera. However, it can also be attempted with a standard DSLR (not astro-modified). So there are plenty of options...
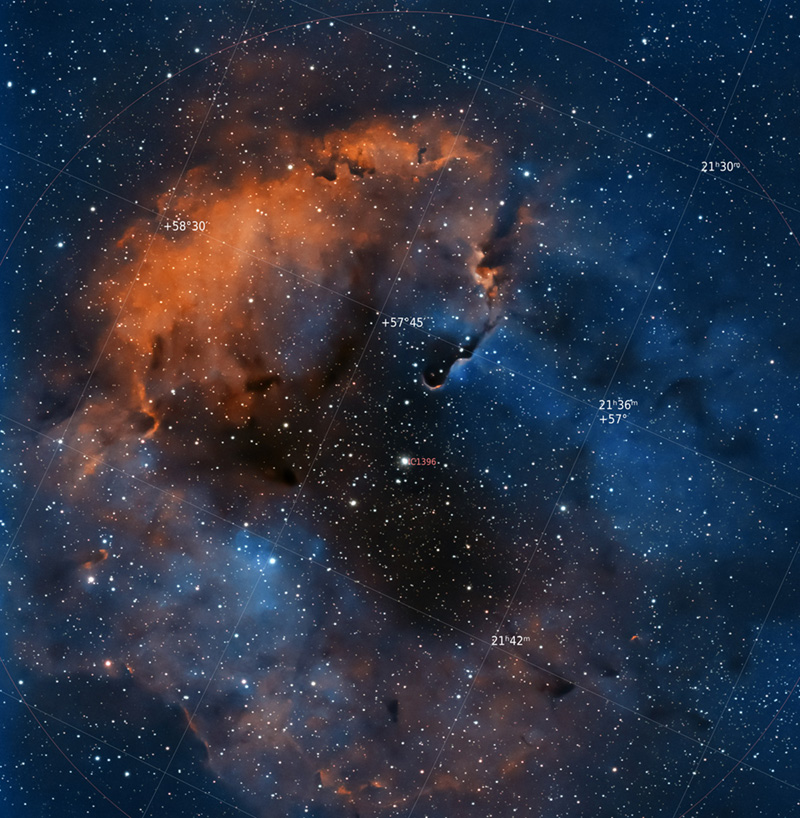
Image Gallery – The Elephant’s Trunk Nebula – IC 1396
How to Locate the Elephant’s Trunk Nebula – IC 1396 in the Sky
Once the Cepheus constellation has been identified in the northern sky, the Elephant’s Trunk Nebula can be found very close to the Garnet Star in Cepheus, as indicated in the image below. In practice, this star should be used as the main reference point.

Useful Tips for Photographing the Elephant’s Trunk Nebula (IC 1396)
The best period for photographing the Elephant’s Trunk Nebula (IC 1396) is summer and autumn, although this is not a strict rule. I photographed the IC 1396 nebula on May 27, 2022, when, as darkness fell, our nebula also began to appear. The problem is that at the end of spring it is still positioned quite low in the sky, and any obstacle — tree, hill, house, or apartment block — can block the target. This is exactly what happened to me: I had to wait more than half an hour until the entire nebula rose from behind a fir tree. In addition, when the target is quite low, close to the horizon, atmospheric turbulence can be more pronounced.
I photographed the IC 1396 nebula near Bucharest, under a Bortle 6 sky. Initially, I wanted to photograph either the Crescent Nebula or the Veil Nebula, but I realized that the position where I had already set up the equipment was not ideal for those two targets, because the aircraft landing corridor from the airport was in their direction. So I decided to photograph the Elephant’s Trunk Nebula instead, as it was better positioned from my location.
I consider that there are two main ways to frame this nebula:
- either use a shorter focal length (150 mm, maximum 250 mm in the case of a pixel size similar to mine — 3.76 μm for the ASI 533 MC-PRO), so that the entire IC 1396 nebula appears in the image, including the silhouette of the Trunk and the Garnet Star in Cepheus
- or focus only on the silhouette of the Trunk and use a longer focal length (500–600 mm)
- besides these two approaches, there is also another option: if one wants to include in the same frame the spectacular SH2-129 nebula (“The Flying Bat” and the “Blue Squid”), a much more difficult nebula to process, requiring a longer integration time. In this case, the telephoto lens/telescope should be aimed at a point between the two nebulae (IC 1396 and SH2-129), using a short focal length. In my case, this would be approximately 85–100 mm.
I used a ZWO ASI 533 MC-PRO color astronomy camera, with a Sigma 150–600 lens at a focal length of 250 mm and an aperture of f/8.0. The camera was cooled to -10 degrees Celsius, while the outside temperature was approximately 15–20 degrees.
To fight light pollution, I used a 1.5-inch Optolong L-eXtreme filter. This is a narrowband filter useful when aiming for a bicolor image, as it allows the wavelengths corresponding to Ha and OIII to pass through.
As usual, ASIAIR+ is the brain of the entire setup, through which most operations are performed: focus checking, identifying the point in the sky where the telephoto lens is aimed using a plate-solving algorithm, camera settings (number of frames, exposure time, gain), and guiding.
I also used an ASI 120 MM guide camera, a Manfrotto CX PRO3 tripod, and two dedicated batteries: Omegon Pro Powerbank 96k LiFePO4 307Wh 12V + Celestron Powertank Lithium Pro LiFePO4 159Wh.
Processing Images of the Elephant’s Trunk Nebula – IC 1396
What I found unusual about this nebula is that its silhouette did not appear at all in the ASIAIR application. As a result, I wasn’t sure whether I was actually capturing the intended target… only the plate-solving algorithm confirmed that the framing was correct. Only after downloading, stacking, and processing the images did the nebula become visible. So if nothing appears (except stars) in a single frame, there is no problem… it will appear during processing.


Single frame (.fit) vs. final processed image
The first step is loading the frames (Light, Flat, Bias, etc.) into PixInsight using Script >> Batch Processing >> WeightedBatchPreprocessing to stack the images, after which the software will export a single final frame that we will work on. I prefer this simpler method with minimal settings, although there are many other more advanced stacking options (including within PixInsight itself). There are also several alternative software solutions: DeepSkyStacker (the most widely used software for Windows), SIRIL (Windows, Linux, and Mac), or Starry Sky Stacker (Mac).
Below you can see several stages:
- a raw (.FIT) frame captured with the ASI 533 MC-PRO, where the nebula’s silhouette is not visible
- the master frame obtained in PixInsight after stacking all frames
- the master frame processed with BackgroundNeutralization. On this image, DynamicBackgroundExtraction should be applied to remove gradients, followed by SCNR (to remove the green cast). Then noise reduction is applied, stars are extracted (STARNET++), and processing continues on the starless image. At the end, the stars-only image is recombined with the processed starless image using PIXELMATH
- the final processed image – standard version (PixInsight + Photoshop)
- the final processed image using an HOO color palette – an unsuccessful attempt
- the final processed image using an HOO color palette – this is the version I consider acceptable