

- name: North America Nebula (NGC 7000)
- location: Cygnus (Swan) constellation
- RA: 21hr 01' 48"; DEC: +44º 12' 00"
- distance from Earth: 2,200 light-years
- magnitude: 4.0
- apparent size: 2º x 30'
About the North America Nebula (NGC 7000)
The North America Nebula is an emission nebula located in the Cygnus (Swan) constellation and is one of the relatively easy targets for beginner astrophotographers (like myself), because it is easy to locate in the summer sky, quite bright (magnitude 4), and covers a large area (2º x 30').
Its shape resembles the North American continent, which is how it got its name.
Due to its large apparent size, it can be photographed with short focal lengths (100–400 mm), using both camera lenses and small telescopes. Zoom lenses such as Canon/Nikon/Sigma 70–200, 70–300, Canon 100–400, or Tamron/Sigma 150–600, as well as prime lenses like the Samyang 135mm, can be successfully used.
It can be photographed both with standard (unmodified) cameras, as you will see later on this page, and with dedicated astro cameras (recommended – see the images below).
Right next to it lies the Pelican Nebula, and the two are often photographed together.

Image Gallery – North America Nebula, Cygnus Wall
Gallery of 5 images – The Cygnus Wall (summer 2023): EQ6-R mount, ASI 533MC camera, Sigma 150–600, ASIAIR+, L-eXtreme filter
Image Gallery – North America Nebula (NGC 7000) and Pelican Nebula – July 2, 2022, Orlești, ASI 533 MC cooled to -5°C, SkyGuider Pro, guiding via ASIAIR+, Sigma 150–600 @150mm @f/8.0, L-eXtreme filter, 3h30 integration
The North America Nebula was one of the first astrophotography targets I attempted using a SkyGuider Pro, an unmodified Canon 7D, and an intervalometer back in 2020 (the year I started astrophotography):
Year 2020:
The first more “serious” attempts were in 2021:
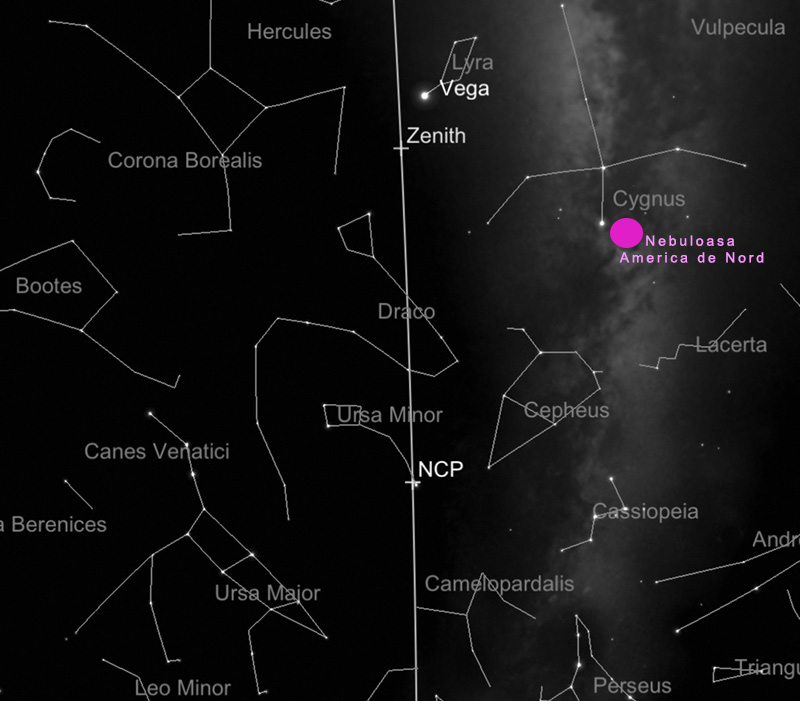
How to find the North America Nebula (NGC 7000) in the sky
On summer nights, simply look toward the zenith (straight up) and you will see the Cygnus (Swan) constellation in the shape of a cross. At the top of this cross lies one of the brightest stars in the sky (Deneb). Just below this star is the nebula, approximately along a perpendicular dropped from Deneb onto the axis connecting Deneb and Sadr (the center of the cross).
Useful tips for photographing the North America Nebula (NGC 7000)
The optimal time to photograph the North America Nebula is during summer, when the Cygnus constellation is easy to identify and allows for full-night imaging sessions.
The nebula can be photographed using standard DSLR/Mirrorless cameras, modified astro cameras, or dedicated astro cameras (color or mono). If using a color camera (modified or not), it is important to use a dual narrowband filter (e.g., Optolong L-eXtreme, L-Ultimate, Antlia duo-band, etc.) or an Ha filter. I even tried without any filter, using just an unmodified Canon 7D—the result was disappointing but proves it is possible if the integration time is long enough (>5 hours). A star tracker or Go-To mount is essential.
As with any emission nebula, the best results are achieved using a mono camera with dedicated filters (Ha, OIII, SII).
There are multiple framing options:
- a wide-field composition including both the North America Nebula and the Pelican Nebula (as shown in my images)
- framing only the North America Nebula
- or focusing on a more detailed region such as the Cygnus Wall, using a longer focal length. I first photographed it in 2023 and the result exceeded my expectations. Approximate coordinates: RA 21h 01' 48", DEC +44º 12' 00".
Processing images of the North America Nebula (NGC 7000)


Single 3-minute frame (.fit; Debayered, ColorCalibration, SCNR) vs. final processed image
The first step is loading the frames (Light, Flat, Bias, etc.) into PixInsight using Script >> Batch Processing >> WeightedBatchPreprocessing to stack them, after which the software exports a single final frame to work with. I prefer this simpler approach with minimal settings, although more advanced stacking options exist (including within PixInsight). Other software options include DeepSkyStacker (most widely used on Windows), SIRIL (Windows, Linux, and Mac), or Starry Sky Stacker (Mac).
Some of the processing steps in PixInsight applied to the final master-light frame:
- Screen Transfer Function (STF) – to visualize the image
- Dynamic Crop
- Background Neutralization – to remove the green tint
- SCNR
- Color Calibration / Photometric Color Calibration
- Dynamic Background Extraction – manually placing points to remove gradients caused by light pollution
- Use of plugin – BlurXTerminator
- Starnet2 – to generate two images: a starless image and a stars-only image. From this point on, processing is done on the starless image.
- Curves Transformation – to increase saturation and improve colors
- Optionally, an HOO-type processing can be applied by extracting the color channels (R, G, B). Only R and G are used. A new B channel is generated in PixelMath using 0.75×R + 0.25×G → B. A new image is then created using LRGB combination, where R→L, R→R, B→G, G→B. Further processing is done on this new image. I used this technique for processing images of the Cygnus Wall.
- Then the frames are recombined: the starless image is overlaid with the stars-only image using PixelMath with the formula combine (Starless, Stars, op_screen())
- The image is transformed from linear to non-linear and exported as a 16-bit TIFF
- Optionally, star reduction can be applied using Morphological Transformation or newer scripts created by Bill (AnotherAstroChannel), described in Lukomatiko’s video. Scripts can be downloaded here.
Below are several stages:
- a single unprocessed (.FIT) frame captured with the ASI 533 MC-PRO at 3 minutes
- the master frame resulting from stacking all frames in PixInsight (unprocessed; gradient visible)
- the processed starless master frame
- the final HOO processed image