
- name: The Bubble Nebula (NGC 7635, Sharpless 162, Caldwell 11)
- location: Cassiopeia Constellation
- RA: 23hr 20' 12"; DEC: +61º 11' 00"
- distance from Earth: 11,000 light-years
- magnitude: 11
- apparent size: 15′ × 8′
About the Bubble Nebula (NGC 7635)
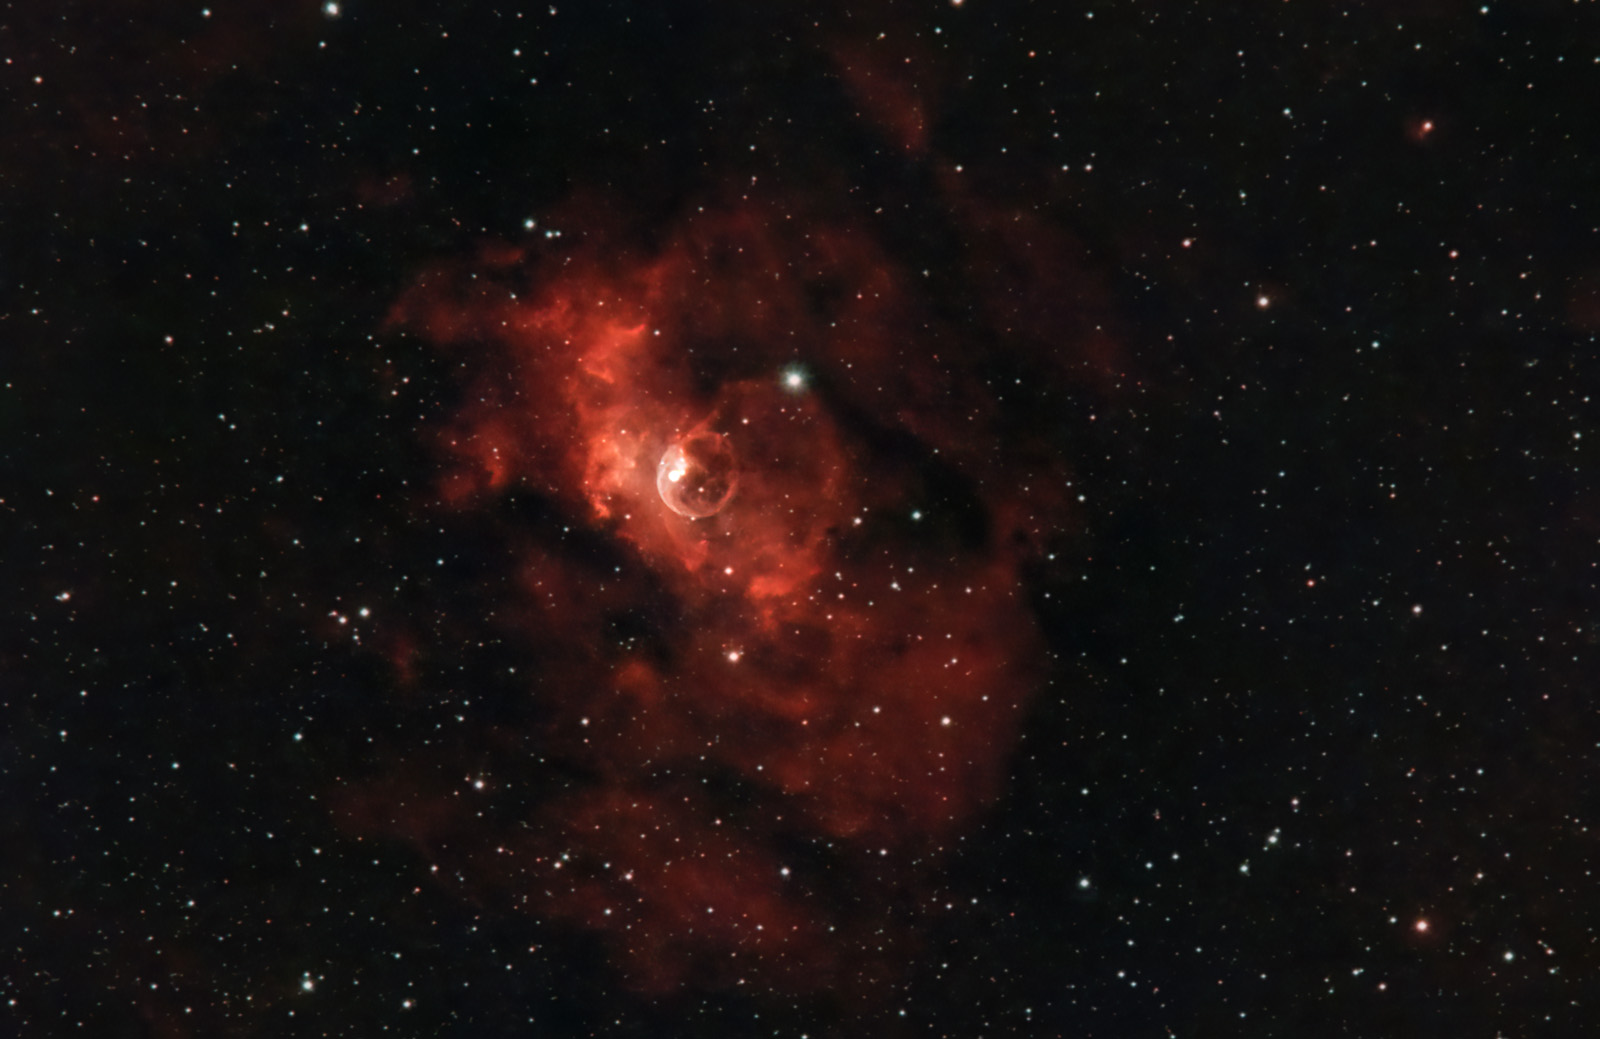
The Bubble Nebula (NGC 7635) is a spectacular emission nebula located in the constellation Cassiopeia, discovered in 1787 by William Herschel.
Its spherical shape was created by stellar winds emitted by a star located within it (SAO 20575). This star is hundreds of thousands of times more luminous and about 45 times larger than our Sun. The diameter of the bubble is enormous, reaching about 10 light-years.

Bubble Nebula (NGC 7635) Image Gallery
How to Locate the Bubble Nebula (NGC 7635) in the Sky
Although the Bubble Nebula is officially located in Cassiopeia, visually it lies between Cepheus and Cassiopeia. If we have a Go-To mount, things are simple: the mount can automatically point to the desired target.
However, if we only have a star tracker — a mount without Go-To, such as the iOptron SkyGuider Pro — things are a little more complicated:
- the first step is to know the coordinates of the target being photographed (“RA” and “DEC”). A mobile app such as STELLARIUM can be used: search for the name of the nebula to be photographed, and the app will display its coordinates: RA and DEC.
- then we need to visually identify the two constellations in the sky — Cassiopeia and Cepheus — and roughly aim somewhere between them. Personally, I have been using ZWO ASIAIR+ for about three months, which allows me to identify the exact position in the sky where the telescope/lens is pointing: through a plate-solving algorithm, ASIAIR+ displays the exact position at the center of the image as two celestial coordinates: RA (right ascension) and DEC (declination).
If we know the exact position of our target, we need to manually adjust RA by rotating the star tracker’s axis until we get close to the desired coordinate. After RA has been set correctly, we then adjust the declination so that the DEC displayed by ASIAIR+ is as close as possible to the declination of our target.
The process is not exactly simple and involves several repetitive steps:
a) by entering Preview mode in the mobile app connected to ASIAIR+, we take an image and press the Plate Solving button. This will display the RA and DEC coordinates.
b) we compare the displayed RA with the target’s RA and gently rotate the star tracker’s axis; then we take another image and press the Plate Solving button again to see whether we have moved closer to the target RA value... and so on, until the displayed RA is as close as possible to the target’s RA.
c) then, step by step, we adjust the declination until the DEC coordinates displayed by ASIAIR+ are as close as possible to our target’s declination.
An interesting tutorial for locating any target in the sky using ASIAIR+ can be found here: WATCH VIDEO
In principle, I estimate that any target can be centered fairly accurately in a maximum of 15 minutes, even when using a mount without Go-To, as long as we have software or an app capable of plate solving.

Useful Tips for Photographing the Bubble Nebula (NGC 7635)
I photographed the Bubble Nebula during Orthodox Easter, on April 23, 2022, and April 26, 2022, from a Bortle 4 sky in a rural area of Oltenia, between Vâlcea and Drăgășani.
The main difficulty was that the nebula is very low in the sky during spring, making it hard to find a location where it is not blocked by houses, trees, or other obstacles. For this reason, it is extremely difficult to photograph from an urban area with buildings.
The evening before, I searched for a suitable spot in the garden and estimated the nebula’s trajectory using a few stars from the Cepheus constellation as reference. I realized it would pass very close to the horizon, but just above the house roof. The next evening, my estimation proved correct, and the roof did not block the nebula.
I believe a much better period for photographing it would be during summer or early autumn, when the Bubble Nebula is positioned higher in the sky at reasonable hours during the night.
Another difficulty is that, being very low in the sky, it is often in the direction of light sources, so light pollution can be quite significant.
The nebula is best photographed using a dedicated mono astronomy camera with narrowband filters (Ha, SII, and OIII). I used a color astronomy camera (ASI 533 MC-PRO) together with a narrowband filter: Optolong L-eXtreme. This filter, which I am very satisfied with, completely removed light pollution and highlighted the Ha (hydrogen-alpha) and OIII (oxygen III) emissions.
The Bubble Nebula can also be photographed with an astro-modified DSLR, although a narrowband filter (such as Optolong L-eXtreme or Optolong L-eNhance) is recommended. I don’t think many details can be captured using a standard DSLR (unmodified) without filters… but it is worth trying.
Equipment used:
- Mount (star tracker): iOptron SkyGuider Pro with iPolar (polar alignment using a laptop)
- ZWO ASI 533 MC-PRO camera
- Sigma 150–600 f/5.6–6.3 Contemporary lens
- Optolong L-eXtreme dual-band 1.5" filter
- ASIAIR+
- ASI 120 MM guide camera
- Manfrotto CX PRO3 tripod
- 2 dedicated batteries: Omegon Pro Powerbank 96k LiFePO4 307Wh 12V + Celestron Powertank Lithium Pro LiFePO4 159Wh
- Omegon dew heater band
On the first night, I photographed the Bubble Nebula at 250 mm, f/8.0, gain 101, with the ASI 533 MC-PRO camera cooled to -15°C. I captured 51 Light frames of 5 minutes each, 20 Flat frames, and 100 Bias frames, for a total of 4 hours and 15 minutes. I framed the image so that both the Bubble Nebula and the Lobster Claw Nebula would be visible.
On the second night, I photographed the Bubble Nebula at 600 mm, f/8.0, gain 101, with the ASI 533 MC-PRO camera cooled to -15°C. I captured 77 Light frames (3 minutes each), 20 Flat frames, and 100 Bias frames (from a library created a few months earlier), for a total of nearly 4 hours. This time I framed the Bubble Nebula as precisely as possible. Wind caused some issues: even light gusts affected guiding quality, and some frames had to be discarded because the stars were not round at 600 mm with 3-minute exposures. The remaining frames are not perfect either, but I consider them acceptable.
Tips for Processing Images of the Bubble Nebula (NGC 7635)
Like many astrophotography enthusiasts, I use PIXINSIGHT (v1.8.9). The first step is loading the frames (Light, Flat, Bias, etc.) into Script >> Batch Processing >> WeightedBatchPreprocessing to stack them, after which the program exports a single final frame that we will work on. I prefer this simpler method with minimal settings, although there are many more advanced stacking options (including within PixInsight). There are also several alternative software solutions: DeepSkyStacker (the most widely used for Windows), SIRIL (Windows, Linux, and Mac), or Starry Sky Stacker (Mac).
Below you can see how a single frame (.fit format) looks and how the final master frame looks after several minutes of intense processing (the frame from which further processing begins):
Then several processes are applied in PixInsight:
- BackgroundNeutralization (to remove green background)
- ColorCalibration
- SCNR
- noise reduction (EZ Denoise)
- splitting the image into two: a starless image (all stars removed) and a stars-only image, using STARNET2. These two images are then processed separately, so adjustments made to the nebula do not affect the stars. If the stars are too large or not perfectly round (elongated in a certain direction), MorphologicalTransformation and Deconvolution can be used in PixInsight.
Since I am not yet fully comfortable with PixInsight, I perform some final adjustments in Photoshop. Then, at the end, I re-import the modified images into PixInsight and generate the final image by combining the stars-only image with the starless image using PIXELMATH (with a formula such as: starless_image + 0.8 * stars_only_image).