
- name: The Crescent Nebula (NGC 6888, Caldwell 27, Sharpless 105)
- location: Cygnus Constellation
- RA: 20hr 12' 06"; DEC: +38º 21' 00"
- distance from Earth: 5,000 light-years
- magnitude: 10
- apparent size: 20' x 10'
About the Crescent Nebula in the Cygnus Constellation
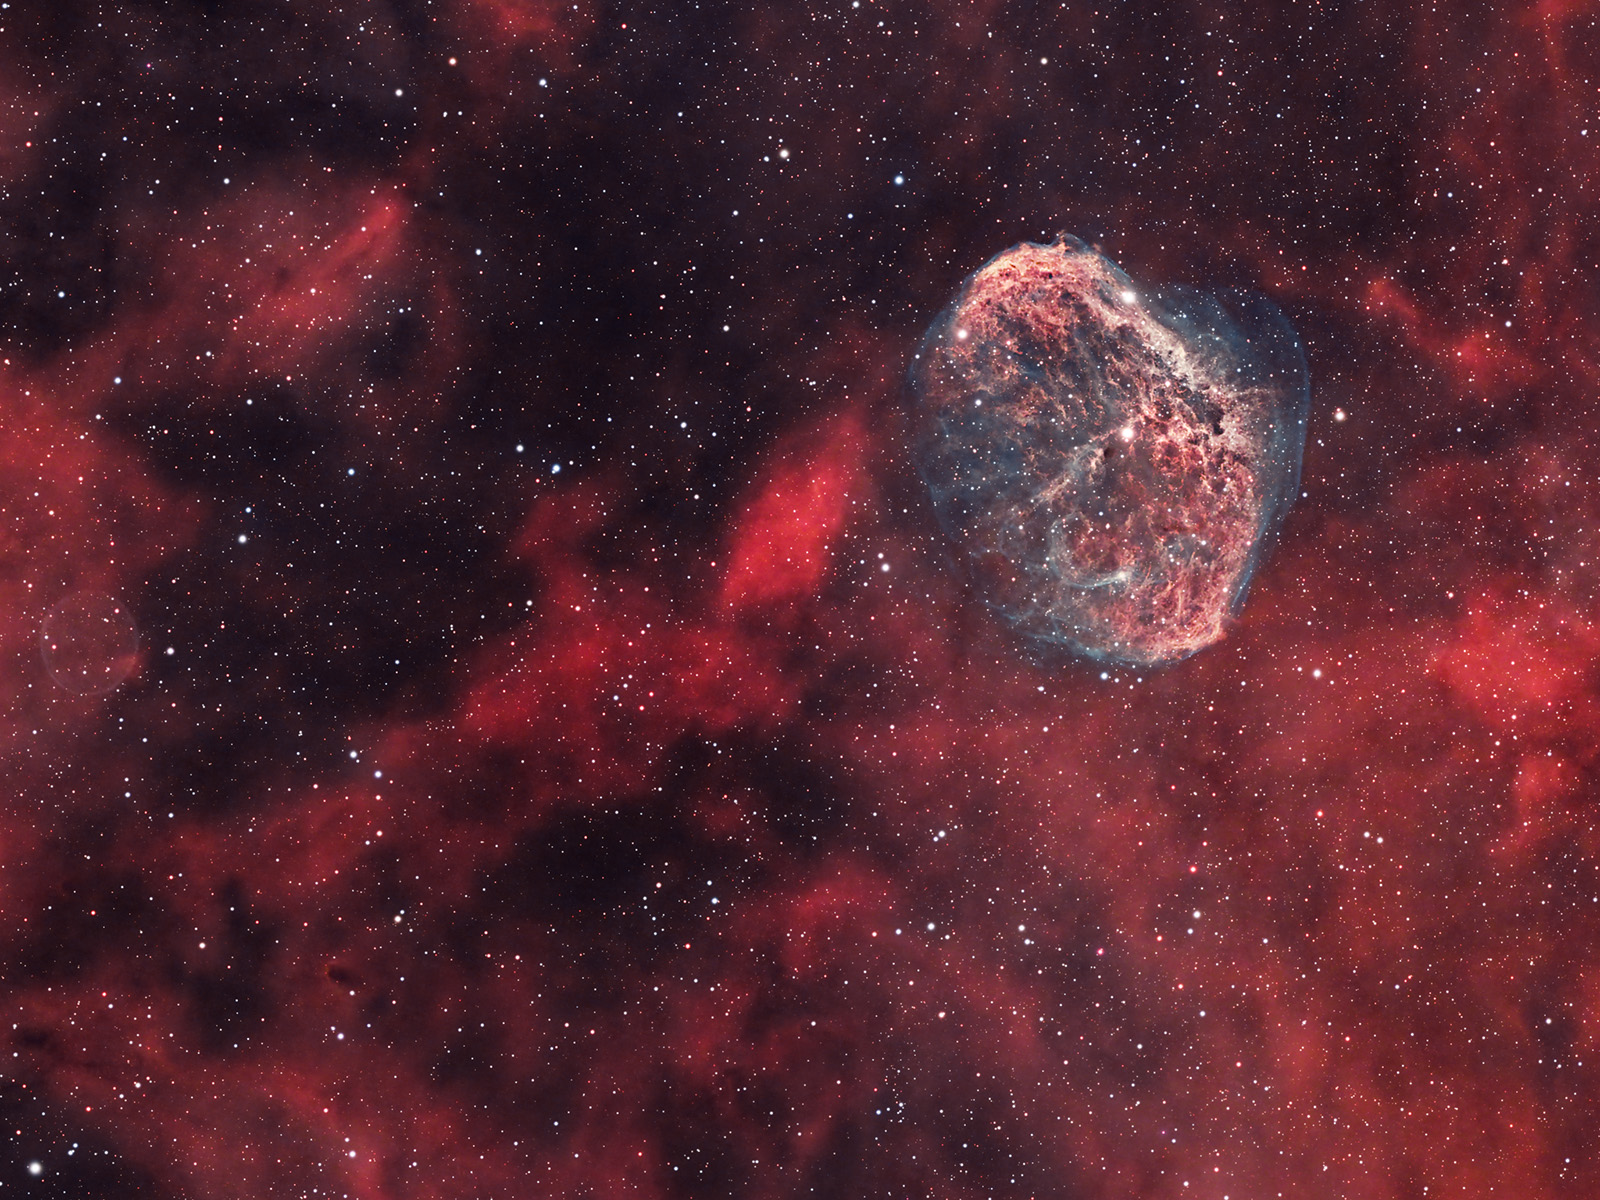
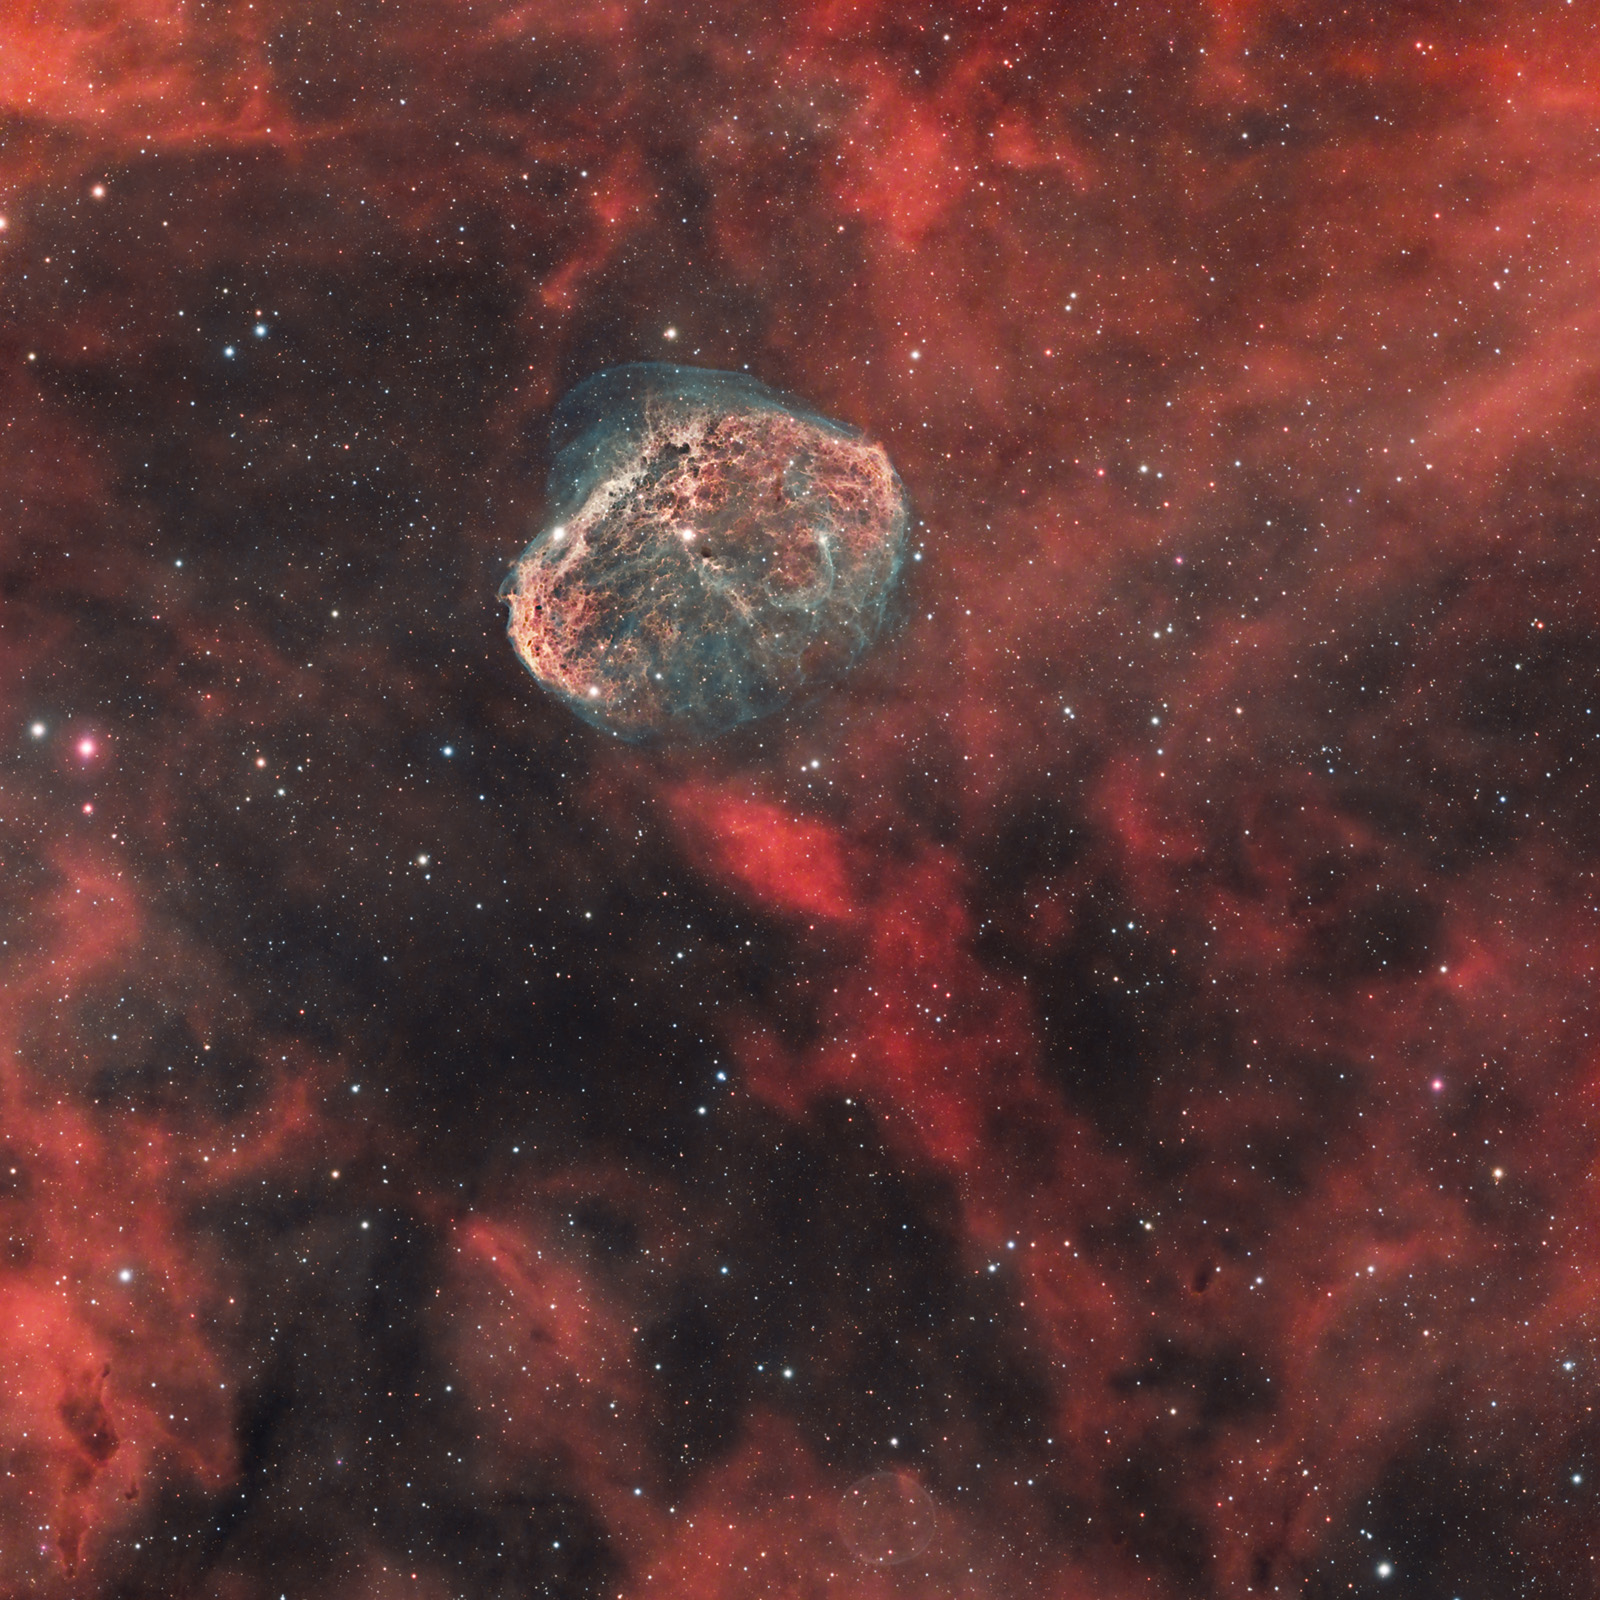
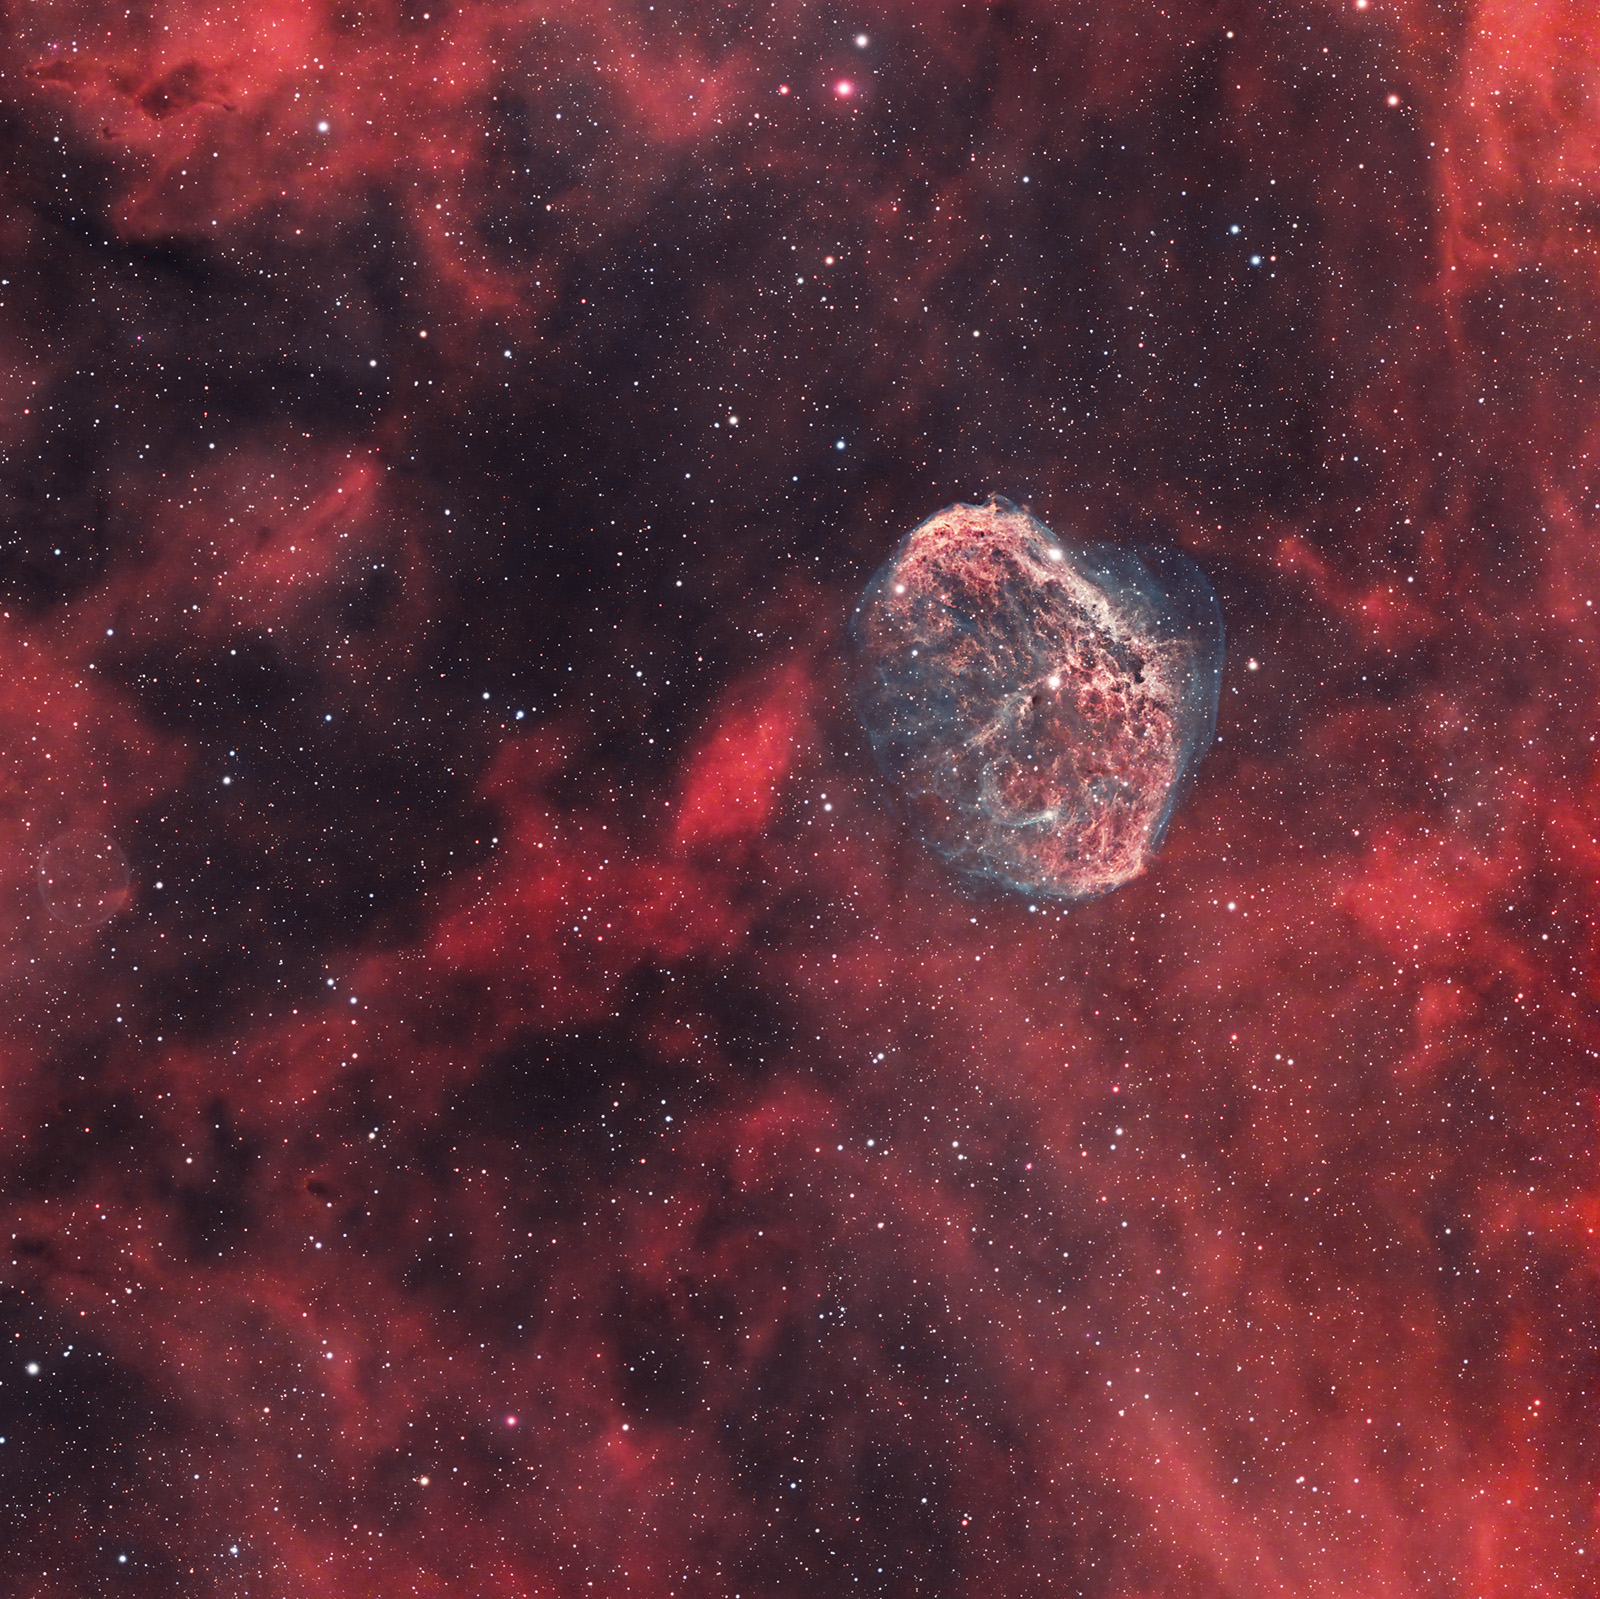
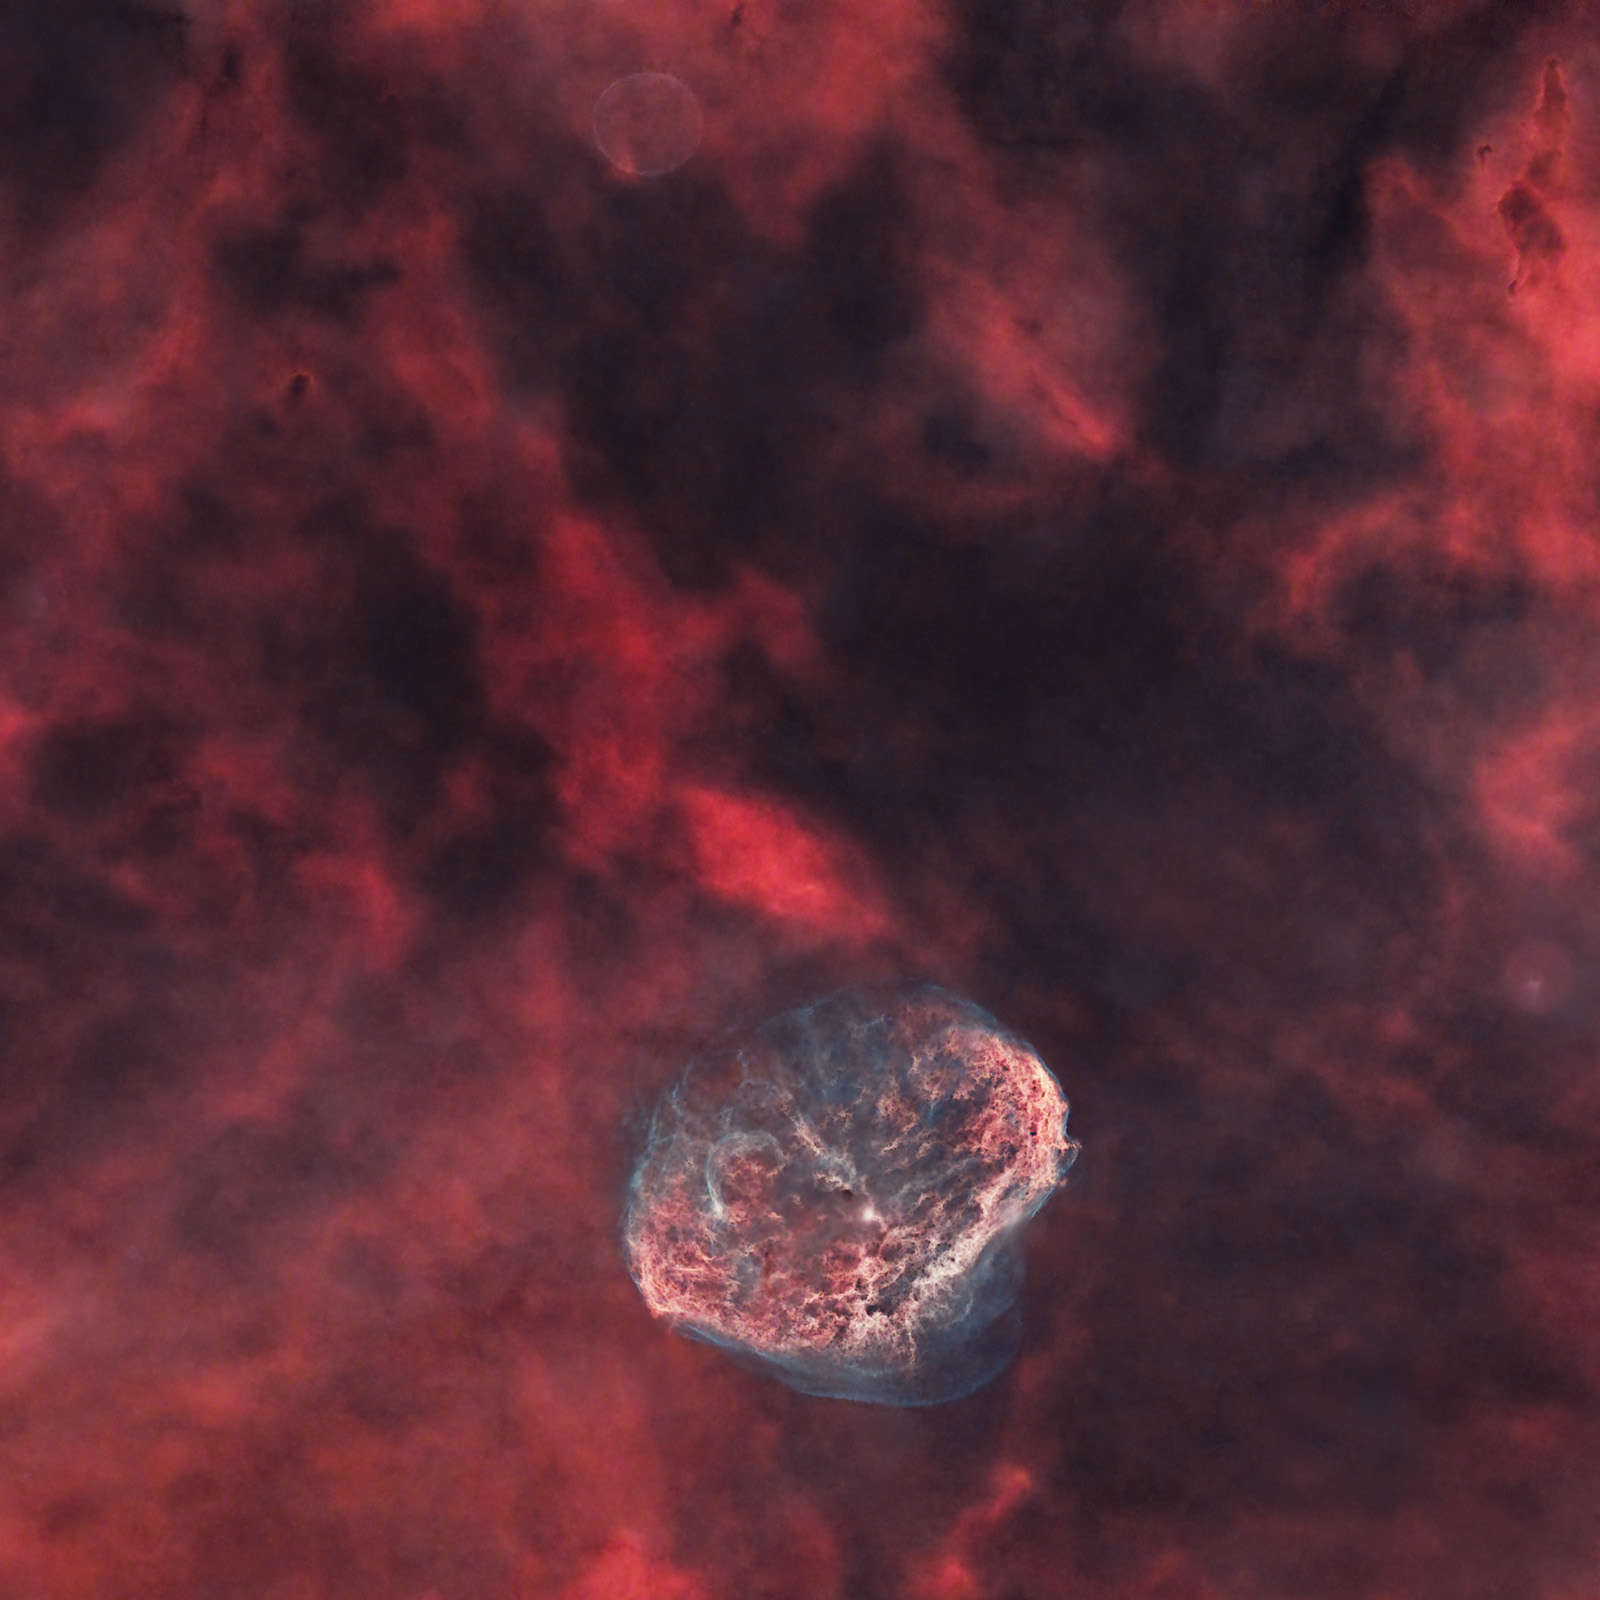
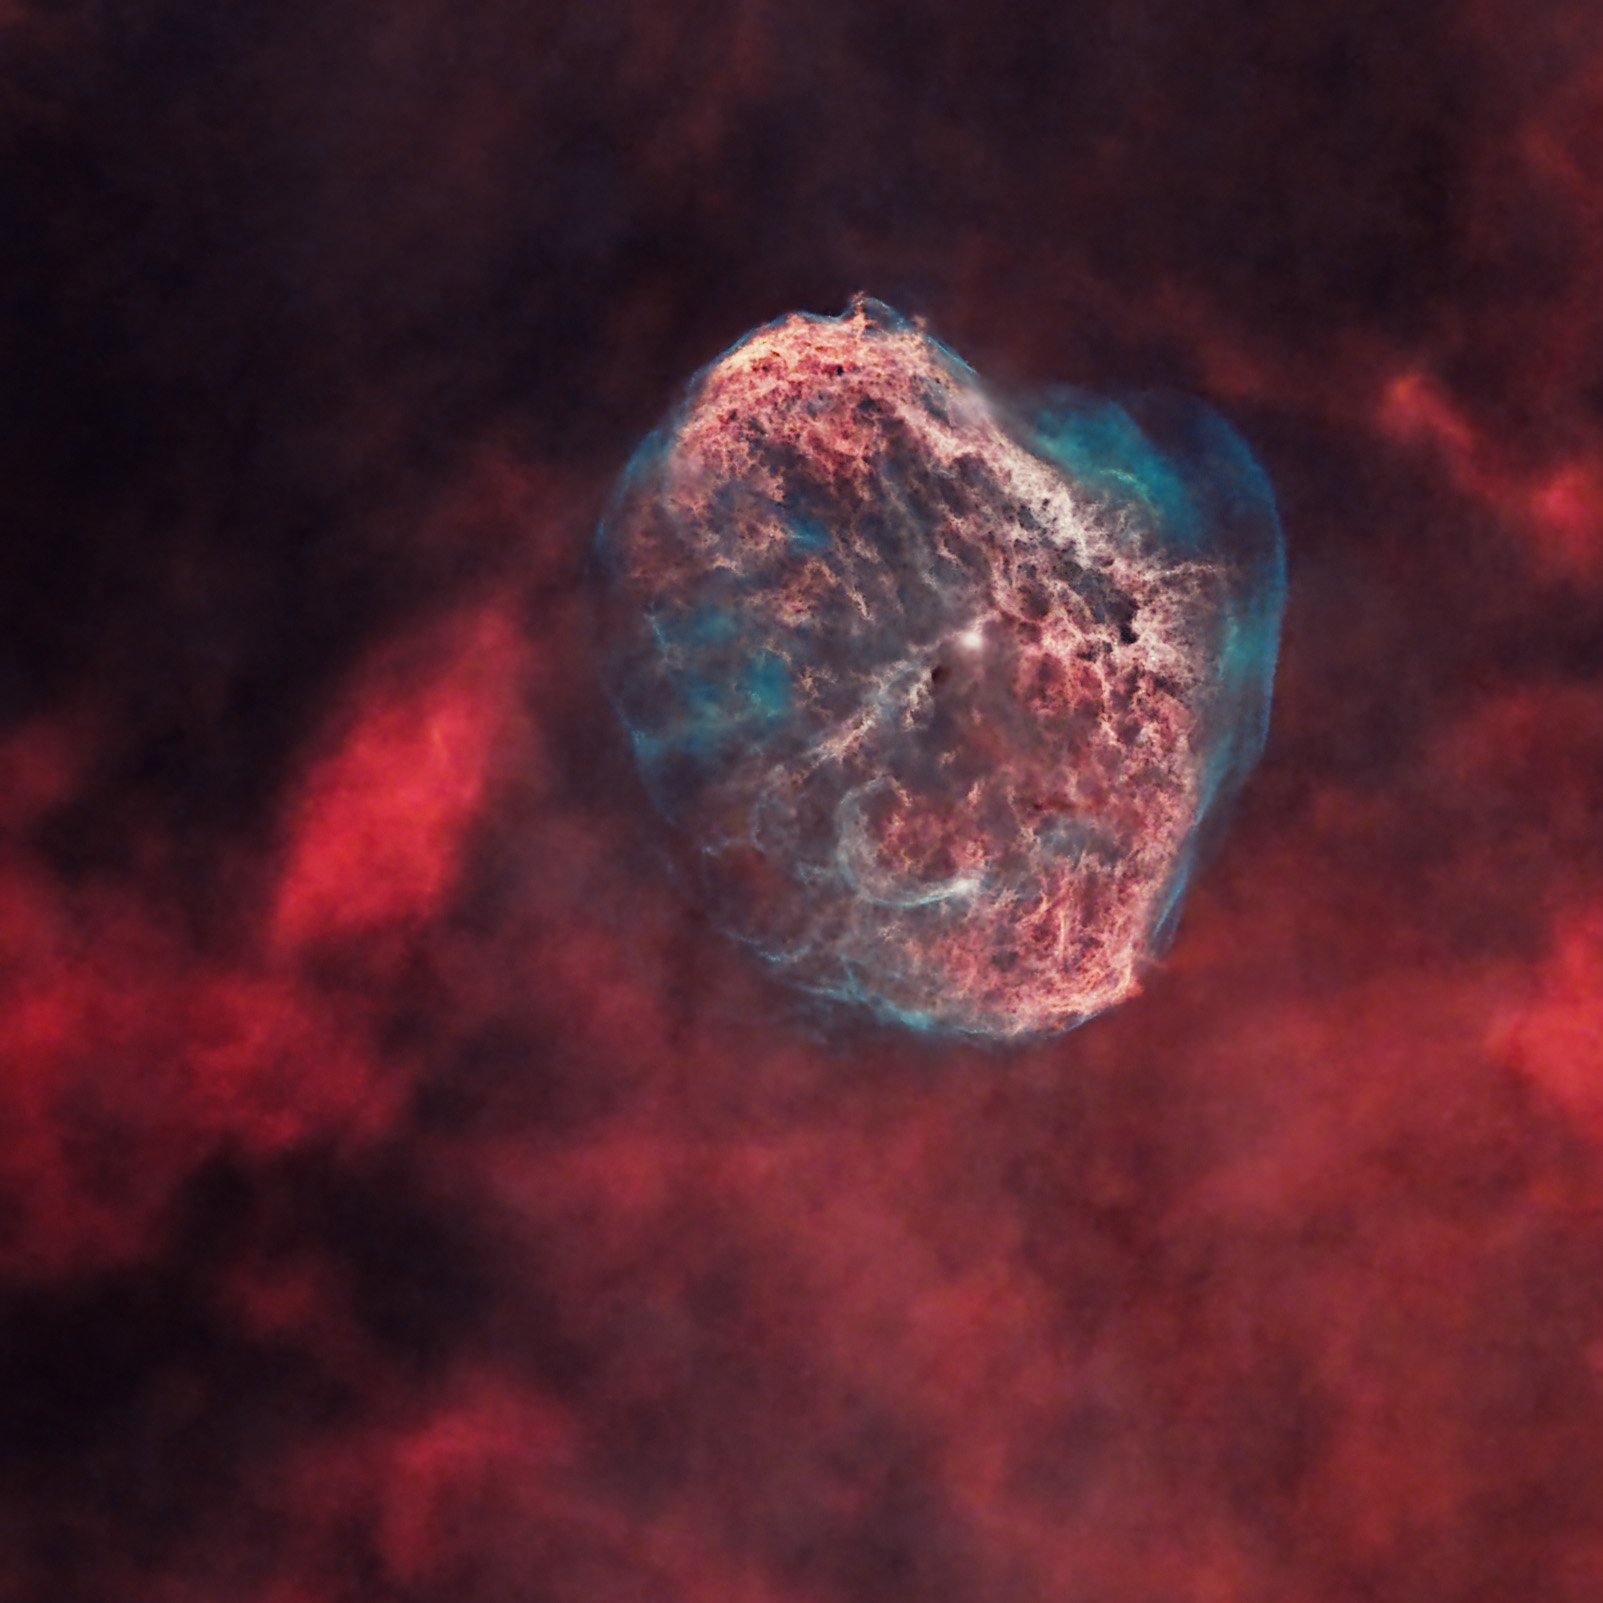
The Crescent Nebula is an emission nebula located in the constellation Cygnus, about 5,000 light-years from Earth, discovered in 1792 by William Herschel.
The diameter of this cosmic bubble, with a brain-like shape, inflated by the stellar winds emitted by the massive star (WR 136, a Wolf–Rayet type) at its center, is approximately 25 light-years.
The bluish-green color of the filaments surrounding the nebula is caused by oxygen emission, while the red color is produced by hydrogen. For this reason, it is a target that can be effectively photographed (like many other emission nebulae) using a dual-band filter (or two separate filters) that allow the wavelengths associated with hydrogen (H-alpha) and oxygen (OIII) to pass through. Examples of dual-band filters suitable for color (OSC) cameras include: Optolong L-eXtreme (7 nm) (as used in my case), Optolong L-Ultimate (3 nm), IDAS NBZ, or Antlia ALP-T dual band 5nm.
Image Gallery – The Crescent Nebula (NGC 6888) and the Soap Bubble Nebula (PN G075.5+01.7) – Summer 2024
Esprit 100 ED telescope, ASI 533 MC camera, L-eXtreme filter, EQ6-R mount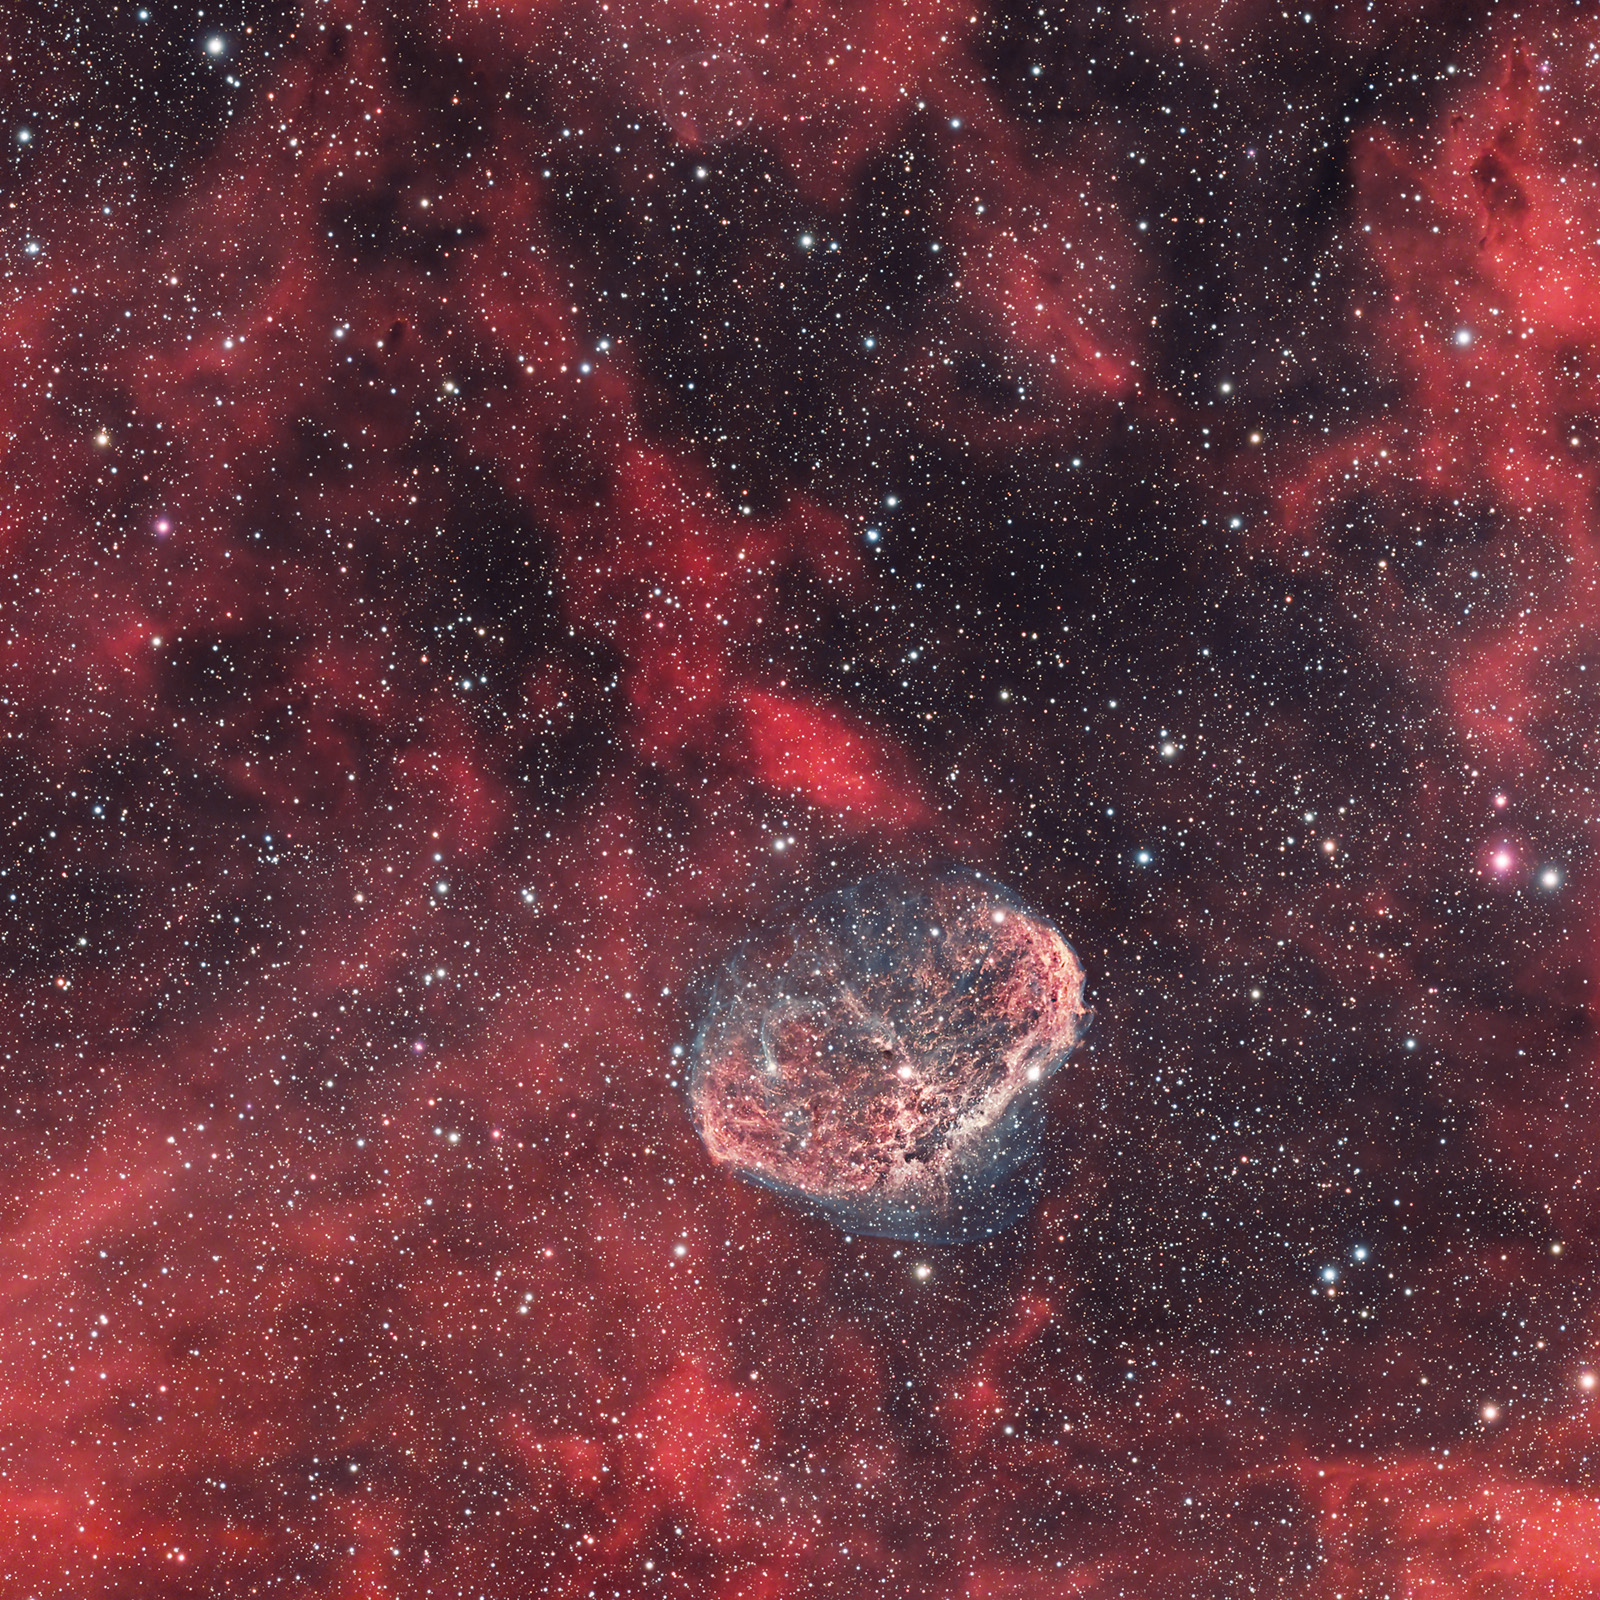
Image Gallery – The Crescent Nebula (NGC 6888)
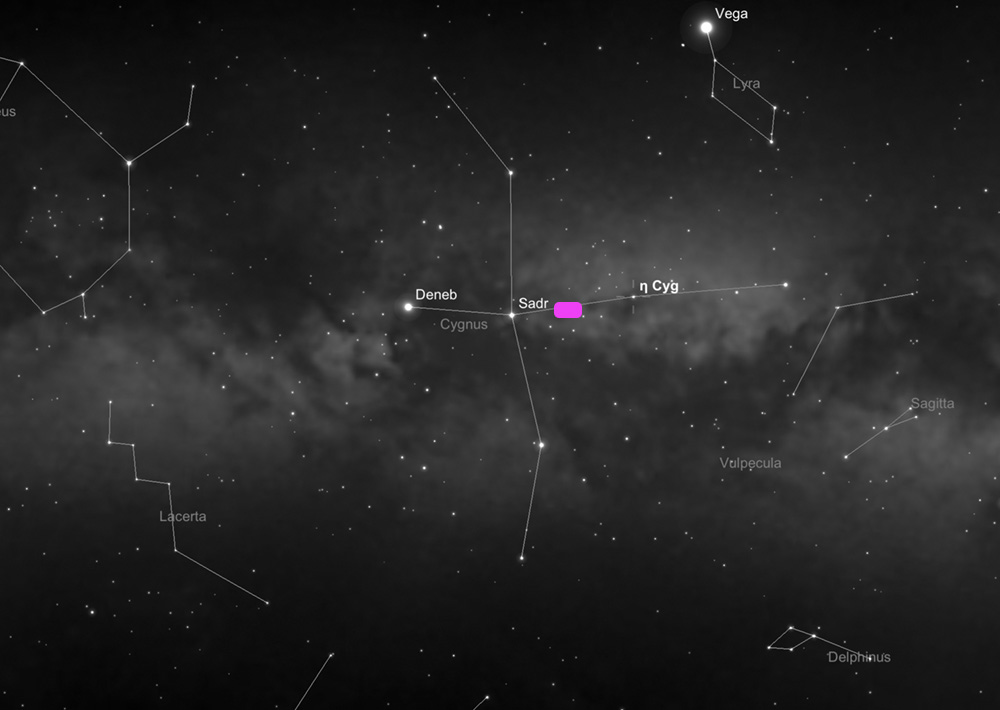
How to Locate the Crescent Nebula – NGC 6888 in the Sky
After easily identifying the Cygnus constellation in the summer night sky — the one shaped like a cross — the Crescent Nebula can be found close to the intersection of the cross arms, marked by the star Sadr: more precisely, on the imaginary line between Sadr and Eta Cygni (η Cygni), as shown in the image below, about one third of the distance from Sadr.

Useful Tips for Photographing the Crescent Nebula
The best period for photographing the Crescent Nebula is from summer to mid-autumn, preferably during the summer months.
The optimal way to photograph the Crescent Nebula is by using a mono astronomy camera and a set of narrowband Ha, OIII and SII filters, with emphasis on the first two channels (Ha + OIII; the SII signal is very weak and can even be omitted).
My first attempt to photograph it was on August 15, 2021, from a rural Bortle 4 sky, using a SkyGuider Pro with iPolar, an unmodified Canon 7D DSLR camera, a Sigma 150–600 lens at 600 mm and f/7.1, without filters and without guiding. Centering the nebula at 600 mm was difficult, but not impossible, using the easily recognizable star Sadr as a reference in the night sky. It was the year — the summer — when I started astrophotography.
I captured 50 frames at ISO 1600, some of 60 seconds and others of 90 seconds, along with a few dark frames... and then came the surprise: almost nothing appeared during processing. Maybe I did not yet know how to process the frames properly, or maybe I had too little data... In any case, my conclusion is that such an emission nebula is almost impossible to photograph without dedicated filters and using only an unmodified DSLR camera. The resulting frame can be seen below. With this kind of equipment, it is not really worth the effort... A faint outline can be seen, like a semicircle, which probably led to its name, the Crescent Nebula, although when photographed properly, its shape resembles a large cosmic brain.

The second time I photographed the Crescent Nebula, I used the same SkyGuider Pro with iPolar, with a few small improvements made to the declination adjustment system. I photographed it from the same Bortle 4 village, almost one year after the first attempt, more precisely on June 18, 2022. This time I used a ZWO ASI 533 MC-PRO color camera, with the same Sigma 150–600 lens at a focal length of 600 mm and an aperture of f/8.0. The camera was cooled to -10 degrees Celsius, while the outside temperature was about 18 degrees.
To fight light pollution and to bring out the red and blue regions of the nebula, I used a 1.5-inch Optolong L-eXtreme filter. This is a narrowband filter useful for obtaining a bicolor image, allowing the wavelengths corresponding to Ha and OIII to pass through.
ASIAIR+ is the brain of the entire setup, through which most operations are performed — the laptop being used only in the initial stage, when aligning the mount with the pole star: focus checking, identifying the point in the sky where the telephoto lens is aimed using a plate-solving algorithm, camera settings (number of frames, exposure time, gain, temperature), and guiding.
I also used an ASI 120 MM guide camera, a Manfrotto CX PRO3 tripod, a heating band for the main lens and two dedicated batteries: Omegon Pro Powerbank 96k LiFePO4 307Wh 12V + Celestron Powertank Lithium Pro LiFePO4 159Wh.
I obtained 33 frames of 3 minutes + 63 frames of 2 minutes, for a total of 3 hours and 45 minutes. In addition, I captured 100 bias frames and 20 flat frames, although I noticed that flats are not extremely useful in this case when using the L-eXtreme filter.
The subsequent processing was done in PixInsight and Photoshop.
It is clear that there is a major difference between last year’s attempt and this year’s result (2022), mainly due to the filter and camera used.
In July 2023, I photographed this nebula again, as it is one of my favorite targets. The new piece of equipment was the EQ6-R Pro mount, although I still did not manage to obtain perfectly round stars... I am still working on that, as can also be seen in the images.
Processing Images of the Crescent Nebula (NGC 6888)


Single frame (.fit debayered) vs. Final processed image
The first step is loading the frames (Light, Flat, Bias, etc.) into PixInsight using Script >> Batch Processing >> WeightedBatchPreprocessing in order to stack the frames, after which the software will export a single final image that we will work on. I prefer this simpler method with minimal settings, although there are many other more advanced stacking options (including within PixInsight itself). There are also several alternative software solutions: DeepSkyStacker (the most commonly used software for Windows), SIRIL (Windows, Linux, and Mac), or Starry Sky Stacker (Mac).
Below you can see several stages:
- a raw (.FIT) frame captured with the ASI 533 MC-PRO
- the master frame obtained in PixInsight after stacking all frames
- the master frame processed with BackgroundNeutralization. On this image, SCNR should be applied (to remove the green cast), followed by ColorCalibration. Then noise reduction is applied, stars are extracted (STARNET++), and processing continues on the starless image
- the starless frame before being exported from PixInsight to Photoshop
- the starless frame processed in Photoshop
- the stars-only image